Difference between revisions of "Gullywash"
m |
|||
| (88 intermediate revisions by 11 users not shown) | |||
| Line 1: | Line 1: | ||
| − | {{ | + | {{Infobox map |
| − | + | | title = Gullywash | |
| − | | | + | | image = Gullywash.jpg |
| − | |image= | ||
| − | |||
| − | | | + | | map_type = 5CP |
| − | | | + | | latest_version = cp_gullywash_f9 |
| − | | | + | | first_released = April 9, 2009 |
| − | | | + | | last_updated = June 3, 2022 |
| − | | | + | | developer1 = [https://tf2maps.net/members/arnold.1926/ Jan "Arnold" Laroy] |
| − | + | | official_map = No | |
| − | + | | download = https://dl.serveme.tf/maps/cp_gullywash_f9.bsp | |
| − | |||
| − | |||
| − | |||
| − | |||
| − | | | ||
| − | | | + | | format = [[6v6]] |
| − | | | + | | in_rotation = {{LeagueIconSmall|asiafortress}} [[AsiaFortress Cup 20|Cup 20]]<br>{{LeagueIconSmall|etf2l}} [[ETF2L 6v6 Season 42|ETF2L Season 42]]<br>{{LeagueIconSmall|rgl}} [[RGL Traditional Sixes Season 10|RGL Season 10]]<br>{{LeagueIconSmall|ozfortress}} [[ozfortress Season 35|OZF 35]] |
| − | | | ||
| − | | | ||
| − | | | ||
| − | |||
| − | |||
| − | |||
| − | |||
| − | |||
| − | |||
| − | |||
| − | |||
| − | |||
| − | |||
| − | | | ||
| − | | | ||
| − | | | ||
| − | | | ||
| − | |||
| − | | | ||
}} | }} | ||
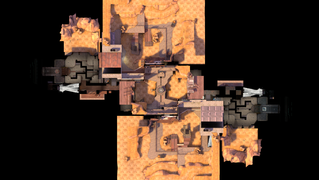
| − | ''' | + | '''Gullywash''' is a [[5CP]] map created by [https://tf2maps.net/members/arnold.1926/ Jan "Arnold" Laroy]. The map was first posted to the TF2Maps.Net forums on April 9, 2009 and was promptly included in [[ETF2L 6v6 Season 6]] later that year. The map has been a staple in the competitive [[6v6]] scene since then, and was officially added to the game on October 13, 2011. |
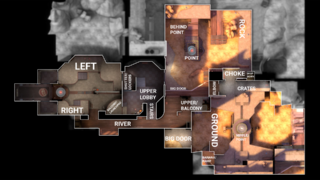
| − | + | Gullywash is well-known for its more closed design; featuring only two entrances ([[#Second Point|choke]] and [[#Second Point|big door]]) to its [[#Middle Point|middle point]] as opposed to the more popular three entrances. This can often lead to more stalemates and slower play around the second point. In contrast, Gullywash is notorious for its relatively fast-capping [[#Last|last point]] featuring a flank route underneath the point known as "water". | |
| − | Gullywash | ||
| − | == | + | == Callouts == |
| − | + | === Mid point === | |
| − | |||
| − | |||
| − | |||
| − | |||
| − | |||
| − | === | ||
{{Map locations | {{Map locations | ||
| − | | title = Gullywash | + | | title = Gullywash mid point callouts |
| image = Gullywash_Middle_Point.jpg | | image = Gullywash_Middle_Point.jpg | ||
| area1 = Choke | | area1 = Choke | ||
| Line 68: | Line 35: | ||
| x4 = 616px | | x4 = 616px | ||
| y4 = 277px | | y4 = 277px | ||
| − | | area5 = Elbow | + | | area5 = Elbow / Banana |
| x5 = 315px | | x5 = 315px | ||
| y5 = 142px | | y5 = 142px | ||
| Line 74: | Line 41: | ||
| x6 = 390px | | x6 = 390px | ||
| y6 = 90px | | y6 = 90px | ||
| − | | area7 = Ramp / Banana | + | | area7 = Ramp / Small Banana |
| x7 = 80px | | x7 = 80px | ||
| y7 = 170px | | y7 = 170px | ||
| Line 80: | Line 47: | ||
| x8 = 90px | | x8 = 90px | ||
| y8 = 225px | | y8 = 225px | ||
| − | | area9 = | + | | area9 = Top |
| x9 = 295px | | x9 = 295px | ||
| y9 = 200px | | y9 = 200px | ||
}} | }} | ||
| − | === Second | + | === Second point === |
{{Map locations | {{Map locations | ||
| − | | title = Gullywash | + | | title = Gullywash second point callouts |
| image = Gullywash_Second_Point.jpg | | image = Gullywash_Second_Point.jpg | ||
| area1 = Upper / Balcony | | area1 = Upper / Balcony | ||
| x1 = 535px | | x1 = 535px | ||
| y1 = 160px | | y1 = 160px | ||
| − | | area2 = | + | | area2 = Rocks |
| x2 = 135px | | x2 = 135px | ||
| y2 = 150px | | y2 = 150px | ||
| Line 98: | Line 65: | ||
| x3 = 680px | | x3 = 680px | ||
| y3 = 230px | | y3 = 230px | ||
| − | | area4 = Lobby | + | | area4 = Lobby / Shutter |
| x4 = 740px | | x4 = 740px | ||
| y4 = 310px | | y4 = 310px | ||
| Line 104: | Line 71: | ||
| x5 = 305px | | x5 = 305px | ||
| y5 = 180px | | y5 = 180px | ||
| + | | area6 = Second Point | ||
| + | | x6 = 425px | ||
| + | | y6 = 310px | ||
}} | }} | ||
| − | ===Lobby=== | + | === Lobby === |
{{Map locations | {{Map locations | ||
| − | | title = Gullywash | + | | title = Gullywash lobby callouts |
| image = Gullywash_Lobby.jpg | | image = Gullywash_Lobby.jpg | ||
| area1 = River | | area1 = River | ||
| Line 116: | Line 86: | ||
| x2 = 400px | | x2 = 400px | ||
| y2 = 140px | | y2 = 140px | ||
| − | | area3 = Lower Lobby / | + | | area3 = Lower Lobby / Wood |
| x3 = 80px | | x3 = 80px | ||
| y3 = 300px | | y3 = 300px | ||
| Line 128: | Line 98: | ||
| x6 = 435px | | x6 = 435px | ||
| y6 = 160px | | y6 = 160px | ||
| + | | area7 = Lobby | ||
| + | | x7 = 340px | ||
| + | | y7 = 360px | ||
}} | }} | ||
| − | ===Last=== | + | === Last point === |
{{Map locations | {{Map locations | ||
| − | | title = Gullywash | + | | title = Gullywash last point callouts (defenders' perspective) |
| image = Gullywash_Last_Point.jpg | | image = Gullywash_Last_Point.jpg | ||
| area1 = Shutter / Lockers | | area1 = Shutter / Lockers | ||
| Line 140: | Line 113: | ||
| x2 = 360px | | x2 = 360px | ||
| y2 = 150px | | y2 = 150px | ||
| − | | area3 = Left | + | | area3 = Left |
| x3 = 80px | | x3 = 80px | ||
| y3 = 300px | | y3 = 300px | ||
| − | | area4 = | + | | area4 = Point |
| x4 = 700px | | x4 = 700px | ||
| y4 = 280px | | y4 = 280px | ||
| Line 152: | Line 125: | ||
| x6 = 485px | | x6 = 485px | ||
| y6 = 190px | | y6 = 190px | ||
| − | | area7 = Right | + | | area7 = Right |
| x7 = 594px | | x7 = 594px | ||
| y7 = 200px | | y7 = 200px | ||
}} | }} | ||
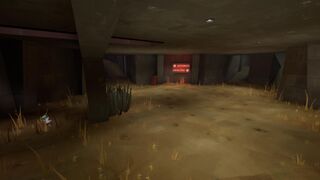
| − | + | * The area underneath the point is known as "water" | |
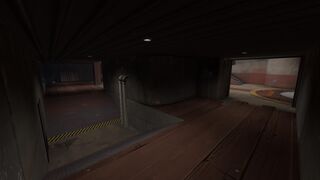
| + | * The area underneath left is known as "secret" | ||
| + | |||
| + | == Rollouts == | ||
| + | The [[Demoman]] rollout leads to choke, whereas the [[Roaming Soldier]] rollout leads to big door with the rest of the team. The [[Medic]] will usually go up elbow and meet the Demoman at choke. | ||
| + | |||
| + | {{Box|start|padding=2em}} | ||
| + | === Demoman === | ||
| + | {{#ev:youtube|fppQ9LzACmk|480}} | ||
| + | {{Box|break}} | ||
| + | === Roaming Soldier === | ||
| + | {{#ev:youtube|lEqu01r6kHY|480}} | ||
| + | {{Box|end}} | ||
| + | |||
| + | == Map information == | ||
| + | Gullywash has one of the shortest last point capture times in the competitive map pool, at 3.8 seconds with x1 multiplier. This, combined with the flank routes below and beside the point (water and secret), make Gullywash prone to round-winning [[Glossary#Backcap|backcaps]]. | ||
| + | |||
| + | {{Box|start|padding=2em}} | ||
| + | {| class="wikitable" width="300px" style="text-align:center" | ||
| + | |+ Point capture times (seconds) | ||
| + | ! Multiplier | ||
| + | ! [[Glossary#Mid|Mid]] | ||
| + | ! [[Glossary#Second|Second]] | ||
| + | ! [[Glossary#Last|Last]] | ||
| + | |- | ||
| + | ! x1 | ||
| + | | 19.00 | ||
| + | | 16.00 | ||
| + | | 3.80 | ||
| + | |- | ||
| + | ! x2 | ||
| + | | 12.67 | ||
| + | | 10.67 | ||
| + | | 2.53 | ||
| + | |- | ||
| + | ! x3 | ||
| + | | 10.36 | ||
| + | | 8.73 | ||
| + | | 2.07 | ||
| + | |- | ||
| + | ! x4 | ||
| + | | 9.12 | ||
| + | | 7.68 | ||
| + | | 1.82 | ||
| + | |- | ||
| + | ! x5 | ||
| + | | 8.32 | ||
| + | | 7.01 | ||
| + | | 1.66 | ||
| + | |- | ||
| + | ! x6 | ||
| + | | 7.76 | ||
| + | | 6.53 | ||
| + | | 1.55 | ||
| + | |- | ||
| + | ! x7 | ||
| + | | 7.33 | ||
| + | | 6.17 | ||
| + | | 1.47 | ||
| + | |- | ||
| + | ! x8 | ||
| + | | 6.99 | ||
| + | | 5.89 | ||
| + | | 1.40 | ||
| + | |- | ||
| + | ! x9 | ||
| + | | 6.72 | ||
| + | | 5.66 | ||
| + | | 1.34 | ||
| + | |- | ||
| + | ! x10 | ||
| + | | 6.49 | ||
| + | | 5.46 | ||
| + | | 1.30 | ||
| + | |- | ||
| + | ! x11 | ||
| + | | 6.29 | ||
| + | | 5.30 | ||
| + | | 1.26 | ||
| + | |} | ||
| + | {{Box|break|padding=2em}} | ||
| + | {| class="wikitable" width="300px" style="text-align:center" | ||
| + | |+ [https://wiki.teamfortress.com/wiki/Respawn#Respawn_times Respawn wave times] (seconds) | ||
| + | ! colspan=5 | Control points owned by opposing team | ||
| + | |- | ||
| + | ! 1 | ||
| + | ! 2 | ||
| + | ! Neutral | ||
| + | ! 3 | ||
| + | ! 4 | ||
| + | |- | ||
| + | | 8.9 | ||
| + | | 8.9 | ||
| + | | 8.9 | ||
| + | | 8.9 | ||
| + | | 8.9 | ||
| + | |} | ||
| + | {{Box|break}} | ||
| + | {| class="wikitable" width="300px" style="text-align:center" | ||
| + | |+ Health and ammo packs | ||
| + | ! [[File:Smallhealth.png|20px|Small health|link=]] | ||
| + | ! [[File:Mediumhealth.png|20px|Medium health|link=]] | ||
| + | ! [[File:Smallammo.png|20px|Small ammo|link=]] | ||
| + | ! [[File:Mediumammo.png|20px|Medium ammo|link=]] | ||
| + | |- | ||
| + | | 16 | ||
| + | | 6 | ||
| + | | 18 | ||
| + | | 8 | ||
| + | |} | ||
| + | {{Box|end}} | ||
| + | |||
| + | == Map pool history == | ||
| + | Gullywash has been a staple in the competitive community since its debut in 2009; being very popular in organized tournaments as well as [[Glossary#PUG,_Pickup|pickup games]]. It is one of very few maps to have only been dropped from the map pool once (in Oceania for [[OWL 5]]). In 2020, the Refresh.tf project began working on Gullywash and released versions of the map with many minor fixes that made it more suited for competitive play. These fixed versions have since been adopted by the community in preference to the official version. | ||
| + | |||
| + | {| class="wikitable emptycells-gray mw-collapsible" style="text-align:center" | ||
| + | |+ style="white-space:nowrap" | Gullywash [[map pool history]] | ||
| + | |- | ||
| + | ! {{abbr|DL|Download link}} | ||
| + | ! Map version | ||
| + | ! style="width:120px" | Asia | ||
| + | ! style="width:120px" | Europe | ||
| + | ! style="width:120px" | North America | ||
| + | ! style="width:120px" | Oceania | ||
| + | |- | ||
| + | ! rowspan=4 | {{download|https://dl.serveme.tf/maps/cp_gullywash_f9.bsp}} | ||
| + | ! style="text-align:left; font-weight:normal" rowspan=4 | <code>cp_gullywash_f9</code> | ||
| + | | | ||
| + | | {{LeagueIconSmall|etf2l}} [[ETF2L 6v6 Season 46|Season 46]] | ||
| + | | | ||
| + | | | ||
| + | |- | ||
| + | | | ||
| + | | {{LeagueIconSmall|etf2l}} [[ETF2L 6v6 Season 45|Season 45]] | ||
| + | | | ||
| + | | | ||
| + | |- | ||
| + | | | ||
| + | | {{LeagueIconSmall|etf2l}} [[ETF2L 6v6 Season 44|Season 44]] | ||
| + | | {{LeagueIconSmall|rgl}} [[RGL Traditional Sixes Season 10|Season 10]] | ||
| + | | {{LeagueIconSmall|ozfortress}} [[ozfortress Season 35|OZF 35]] | ||
| + | |- | ||
| + | | | ||
| + | | {{LeagueIconSmall|etf2l}} [[ETF2L 6v6 Season 43|Season 43]] | ||
| + | | {{LeagueIconSmall|rgl}} [[RGL Traditional Sixes Season 9|Season 9]] | ||
| + | | {{LeagueIconSmall|ozfortress}} [[ozfortress Season 34|OZF 34]] | ||
| + | |- | ||
| + | ! {{download|https://dl.serveme.tf/maps/cp_gullywash_f8.bsp}} | ||
| + | ! style="text-align:left; font-weight:normal" | <code>cp_gullywash_f8</code> | ||
| + | | | ||
| + | | {{LeagueIconSmall|etf2l}} [[ETF2L 6v6 Season 42|Season 42]] | ||
| + | | | ||
| + | | | ||
| + | |- | ||
| + | ! {{download|https://dl.serveme.tf/maps/cp_gullywash_f7.bsp}} | ||
| + | ! style="text-align:left; font-weight:normal" | <code>cp_gullywash_f7</code> | ||
| + | | {{LeagueIconSmall|asiafortress}} [[AsiaFortress Cup 20|Cup 20]] | ||
| + | | | ||
| + | | | ||
| + | | | ||
| + | |- | ||
| + | ! {{download|https://dl.serveme.tf/maps/cp_gullywash_f6.bsp}} | ||
| + | ! style="text-align:left; font-weight:normal" | <code>cp_gullywash_f6</code> | ||
| + | | | ||
| + | | {{LeagueIconSmall|etf2l}} [[ETF2L 6v6 Season 41|Season 41]] | ||
| + | | {{LeagueIconSmall|rgl}} [[RGL Traditional Sixes Season 8|Season 8]] | ||
| + | | {{LeagueIconSmall|ozfortress}} [[ozfortress Season 33|OZF 33]] | ||
| + | |- | ||
| + | ! {{download|https://dl.serveme.tf/maps/cp_gullywash_f4b.bsp}} | ||
| + | ! style="text-align:left; font-weight:normal" | <code>cp_gullywash_f4b</code> | ||
| + | | {{LeagueIconSmall|asiafortress}} [[AsiaFortress Cup 19|Cup 19]] | ||
| + | | | ||
| + | | | ||
| + | | | ||
| + | |- | ||
| + | ! {{download|https://dl.serveme.tf/maps/cp_gullywash_f4a.bsp}} | ||
| + | ! style="text-align:left; font-weight:normal" | <code>cp_gullywash_f4a</code> | ||
| + | | | ||
| + | | {{LeagueIconSmall|etf2l}} [[ETF2L 6v6 Season 40|Season 40]] | ||
| + | | | ||
| + | | | ||
| + | |- | ||
| + | ! {{download|https://dl.serveme.tf/maps/cp_gullywash_f4.bsp}} | ||
| + | ! style="text-align:left; font-weight:normal" | <code>cp_gullywash_f4</code> | ||
| + | | | ||
| + | | | ||
| + | | | ||
| + | | {{LeagueIconSmall|ozfortress}} [[ozfortress Season 32|OZF 32]] | ||
| + | |- | ||
| + | ! rowspan=2 | {{download|https://dl.serveme.tf/maps/cp_gullywash_f3.bsp}} | ||
| + | ! style="text-align:left; font-weight:normal" rowspan=2 | <code>cp_gullywash_f3</code> | ||
| + | | {{LeagueIconSmall|asiafortress}} [[AsiaFortress Cup 18|Cup 18]] | ||
| + | | | ||
| + | | | ||
| + | | {{LeagueIconSmall|ozfortress}} [[ozfortress Season 31|OZF 31]] | ||
| + | |- | ||
| + | | {{LeagueIconSmall|asiafortress}} [[AsiaFortress Cup 17|Cup 17]] | ||
| + | | | ||
| + | | | ||
| + | | {{LeagueIconSmall|ozfortress}} [[ozfortress Season 30|OZF 30]] | ||
| + | |- | ||
| + | ! rowspan=29 | | ||
| + | ! style="text-align:left; font-weight:normal" rowspan=29 | <code>cp_gullywash_final1</code> | ||
| + | | {{LeagueIconSmall|asiafortress}} [[AsiaFortress Cup 16|Cup 16]] | ||
| + | | {{LeagueIconSmall|etf2l}} [[ETF2L 6v6 Season 39|Season 39]] | ||
| + | | {{LeagueIconSmall|rgl}} [[RGL Traditional Sixes Season 7|Season 7]] | ||
| + | | {{LeagueIconSmall|ozfortress}} [[ozfortress Season 29|OZF 29]] | ||
| + | |- | ||
| + | | {{LeagueIconSmall|asiafortress}} [[AsiaFortress Cup 15|Cup 15]] | ||
| + | | {{LeagueIconSmall|etf2l}} [[ETF2L 6v6 Season 38|Season 38]] | ||
| + | | {{LeagueIconSmall|rgl}} [[RGL Traditional Sixes Season 6|Season 6]] | ||
| + | | {{LeagueIconSmall|ozfortress}} [[ozfortress Season 28|OZF 28]] | ||
| + | |- | ||
| + | | {{LeagueIconSmall|asiafortress}} [[AsiaFortress Cup 14|Cup 14]] | ||
| + | | {{LeagueIconSmall|etf2l}} [[ETF2L 6v6 Season 37|Season 37]] | ||
| + | | {{LeagueIconSmall|rgl}} [[RGL Traditional Sixes Season 5|Season 5]] | ||
| + | | {{LeagueIconSmall|ozfortress}} [[ozfortress Season 27|OZF 27]] | ||
| + | |- | ||
| + | | {{LeagueIconSmall|asiafortress}} [[AsiaFortress Cup 13|Cup 13]] | ||
| + | | {{LeagueIconSmall|etf2l}} [[ETF2L 6v6 Season 36|Season 36]] | ||
| + | | {{LeagueIconSmall|rgl}} [[RGL Traditional Sixes Season 4|Season 4]] | ||
| + | | {{LeagueIconSmall|ozfortress}} [[ozfortress Season 26|OZF 26]] | ||
| + | |- | ||
| + | | {{LeagueIconSmall|asiafortress}} [[AsiaFortress Cup 12|Cup 12]] | ||
| + | | {{LeagueIconSmall|etf2l}} [[ETF2L 6v6 Season 35|Season 35]] | ||
| + | | {{LeagueIconSmall|rgl}} [[RGL Traditional Sixes Season 3|Season 3]] | ||
| + | | {{LeagueIconSmall|ozfortress}} [[ozfortress Season 25|OZF 25]] | ||
| + | |- | ||
| + | | {{LeagueIconSmall|asiafortress}} [[AsiaFortress Cup 11|Cup 11]] | ||
| + | | {{LeagueIconSmall|etf2l}} [[ETF2L 6v6 Season 34|Season 34]] | ||
| + | | {{LeagueIconSmall|rgl}} [[RGL Traditional Sixes Season 2|Season 2]] | ||
| + | | {{LeagueIconSmall|ozfortress}} [[ozfortress Season 24|OZF 24]] | ||
| + | |- | ||
| + | | {{LeagueIconSmall|asiafortress}} [[AsiaFortress Cup 10|Cup 10]] | ||
| + | | {{LeagueIconSmall|etf2l}} [[ETF2L 6v6 Season 33|Season 33]] | ||
| + | | {{LeagueIconSmall|rgl}} [[RGL Traditional Sixes Season 1|Season 1]] | ||
| + | | {{LeagueIconSmall|ozfortress}} [[ozfortress Season 23|OZF 23]] | ||
| + | |- | ||
| + | | {{LeagueIconSmall|asiafortress}} [[AsiaFortress Cup 9|Cup 9]] | ||
| + | | {{LeagueIconSmall|etf2l}} [[ETF2L 6v6 Season 32|Season 32]] | ||
| + | | {{LeagueIconSmall|esea}} [[ESEA-I Season 31|Season 31]] | ||
| + | | {{LeagueIconSmall|ozfortress}} [[ozfortress Season 22|OZF 22]] | ||
| + | |- | ||
| + | | {{LeagueIconSmall|asiafortress}} [[AsiaFortress Cup 8|Cup 8]] | ||
| + | | {{LeagueIconSmall|etf2l}} [[ETF2L 6v6 Season 31|Season 31]] | ||
| + | | {{LeagueIconSmall|esea}} [[ESEA-I Season 30|Season 30]] | ||
| + | | {{LeagueIconSmall|ozfortress}} [[ozfortress Season 21|OZF 21]] | ||
| + | |- | ||
| + | | {{LeagueIconSmall|asiafortress}} [[AsiaFortress Cup 7|Cup 7]] | ||
| + | | {{LeagueIconSmall|etf2l}} [[ETF2L 6v6 Season 30|Season 30]] | ||
| + | | {{LeagueIconSmall|esea}} [[ESEA-I Season 29|Season 29]] | ||
| + | | {{LeagueIconSmall|ozfortress}} [[ozfortress Season 20|OZF 20]] | ||
| + | |- | ||
| + | | {{LeagueIconSmall|asiafortress}} [[AsiaFortress Cup 6|Cup 6]] | ||
| + | | {{LeagueIconSmall|etf2l}} [[ETF2L 6v6 Season 29|Season 29]] | ||
| + | | {{LeagueIconSmall|esea}} [[ESEA-I Season 28|Season 28]] | ||
| + | | {{LeagueIconSmall|ozfortress}} [[ozfortress Season 19|OZF 19]] | ||
| + | |- | ||
| + | | {{LeagueIconSmall|asiafortress}} [[AsiaFortress Season 5|Season 5]] | ||
| + | | {{LeagueIconSmall|etf2l}} [[ETF2L 6v6 Season 28|Season 28]] | ||
| + | | {{LeagueIconSmall|esea}} [[ESEA-I Season 27|Season 27]] | ||
| + | | {{LeagueIconSmall|ozfortress}} [[ozfortress Season 18|OZF 18]] | ||
| + | |- | ||
| + | | | ||
| + | | {{LeagueIconSmall|etf2l}} [[ETF2L 6v6 Season 27|Season 27]] | ||
| + | | {{LeagueIconSmall|esea}} [[ESEA-I Season 26|Season 26]] | ||
| + | | {{LeagueIconSmall|ozfortress}} [[ozfortress Season 17|OZF 17]] | ||
| + | |- | ||
| + | | | ||
| + | | {{LeagueIconSmall|etf2l}} [[ETF2L 6v6 Season 26|Season 26]] | ||
| + | | {{LeagueIconSmall|esea}} [[ESEA-I Season 25|Season 25]] | ||
| + | | {{LeagueIconSmall|ozfortress}} [[ozfortress Season 16|OZF 16]] | ||
| + | |- | ||
| + | | | ||
| + | | {{LeagueIconSmall|etf2l}} [[ETF2L 6v6 Season 25|Season 25]] | ||
| + | | {{LeagueIconSmall|esea}} [[ESEA-I Season 24|Season 24]] | ||
| + | | {{LeagueIconSmall|ozfortress}} [[ozfortress Season 15|OZF 15]] | ||
| + | |- | ||
| + | | | ||
| + | | {{LeagueIconSmall|etf2l}} [[ETF2L 6v6 Season 24|Season 24]] | ||
| + | | {{LeagueIconSmall|esea}} [[ESEA-I Season 23|Season 23]] | ||
| + | | {{LeagueIconSmall|ozfortress}} [[OWL 14]] | ||
| + | |- | ||
| + | | | ||
| + | | {{LeagueIconSmall|etf2l}} [[ETF2L 6v6 Season 23|Season 23]] | ||
| + | | {{LeagueIconSmall|esea}} [[ESEA-I Season 22|Season 22]] | ||
| + | | {{LeagueIconSmall|ozfortress}} [[OWL 13]] | ||
| + | |- | ||
| + | | | ||
| + | | {{LeagueIconSmall|etf2l}} [[ETF2L 6v6 Season 22|Season 22]] | ||
| + | | {{LeagueIconSmall|esea}} [[ESEA-I Season 21|Season 21]] | ||
| + | | {{LeagueIconSmall|ozfortress}} [[OWL 12]] | ||
| + | |- | ||
| + | | | ||
| + | | {{LeagueIconSmall|etf2l}} [[ETF2L 6v6 Season 21|Season 21]] | ||
| + | | {{LeagueIconSmall|esea}} [[ESEA-I Season 20|Season 20]] | ||
| + | | {{LeagueIconSmall|ozfortress}} [[OWL 11]] | ||
| + | |- | ||
| + | | | ||
| + | | {{LeagueIconSmall|etf2l}} [[ETF2L 6v6 Season 20|Season 20]] | ||
| + | | {{LeagueIconSmall|esea}} [[ESEA-I Season 19|Season 19]] | ||
| + | | {{LeagueIconSmall|ozfortress}} [[OWL 10]] | ||
| + | |- | ||
| + | | | ||
| + | | {{LeagueIconSmall|etf2l}} [[ETF2L 6v6 Season 19|Season 19]] | ||
| + | | {{LeagueIconSmall|esea}} [[ESEA-I Season 18|Season 18]] | ||
| + | | {{LeagueIconSmall|ozfortress}} [[OWL 9]] | ||
| + | |- | ||
| + | | | ||
| + | | {{LeagueIconSmall|etf2l}} [[ETF2L 6v6 Season 18|Season 18]] | ||
| + | | {{LeagueIconSmall|esea}} [[ESEA-I Season 17|Season 17]] | ||
| + | | {{LeagueIconSmall|ozfortress}} [[OWL 8]] | ||
| + | |- | ||
| + | | | ||
| + | | {{LeagueIconSmall|etf2l}} [[ETF2L 6v6 Season 17|Season 17]] | ||
| + | | {{LeagueIconSmall|esea}} [[ESEA-I Season 16|Season 16]] | ||
| + | | {{LeagueIconSmall|ozfortress}} [[OWL 7]] | ||
| + | |- | ||
| + | | | ||
| + | | {{LeagueIconSmall|etf2l}} [[ETF2L 6v6 Season 16|Season 16]] | ||
| + | | {{LeagueIconSmall|esea}} [[ESEA-I Season 15|Season 15]] | ||
| + | | | ||
| + | |- | ||
| + | | | ||
| + | | {{LeagueIconSmall|etf2l}} [[ETF2L 6v6 Season 15|Season 15]] | ||
| + | | {{LeagueIconSmall|esea}} [[ESEA-I Season 14|Season 14]] | ||
| + | | | ||
| + | |- | ||
| + | | | ||
| + | | {{LeagueIconSmall|etf2l}} [[ETF2L 6v6 Season 14|Season 14]] | ||
| + | | {{LeagueIconSmall|esea}} [[ESEA-I Season 13|Season 13]] | ||
| + | | | ||
| + | |- | ||
| + | | | ||
| + | | {{LeagueIconSmall|etf2l}} [[ETF2L 6v6 Season 13|Season 13]] | ||
| + | | {{LeagueIconSmall|esea}} [[ESEA-I Season 12|Season 12]] | ||
| + | | | ||
| + | |- | ||
| + | | | ||
| + | | {{LeagueIconSmall|etf2l}} [[ETF2L 6v6 Season 12|Season 12]] | ||
| + | | {{LeagueIconSmall|esea}} [[ESEA-I Season 11|Season 11]] | ||
| + | | | ||
| + | |- | ||
| + | | | ||
| + | | {{LeagueIconSmall|etf2l}} [[ETF2L 6v6 Season 11|Season 11]] | ||
| + | | {{LeagueIconSmall|esea}} [[ESEA-I Season 10|Season 10]] | ||
| + | | | ||
| + | |- | ||
| + | ! {{download|https://dl.serveme.tf/maps/cp_gullywash_pro.bsp}} | ||
| + | ! style="text-align:left; font-weight:normal" | <code>cp_gullywash_pro</code> | ||
| + | | | ||
| + | | {{LeagueIconSmall|etf2l}} [[ETF2L 6v6 Season 10|Season 10]] | ||
| + | | {{LeagueIconSmall|esea}} [[ESEA-I Season 9|Season 9]] | ||
| + | | {{LeagueIconSmall|ozfortress}} [[OWL 6]] | ||
| + | |- | ||
| + | ! [[File:Download icon.png|20px|link=https://rotabland.eu/maps/map.php?id=31&type=0]] | ||
| + | ! style="text-align:left; font-weight:normal" | <code>cp_gullywash_imp3</code> | ||
| + | | | ||
| + | | | ||
| + | | {{LeagueIconSmall|esea}} [[ESEA-I Season 7|Season 7]] | ||
| + | | {{LeagueIconSmall|ozfortress}} [[OWL 4]] | ||
| + | |- | ||
| + | ! rowspan=4 | {{download|https://dl.serveme.tf/maps/cp_gullywash.bsp}} | ||
| + | ! style="text-align:left; font-weight:normal" rowspan=4 | <code>cp_gullywash</code> | ||
| + | | {{LeagueIconSmall|asiafortress}} [[AsiaFortress Season 4|Season 4]] | ||
| + | | {{LeagueIconSmall|etf2l}} [[ETF2L 6v6 Season 9|Season 9]] | ||
| + | | | ||
| + | | {{LeagueIconSmall|ozfortress}} [[OWL 3]] | ||
| + | |- | ||
| + | | {{LeagueIconSmall|asiafortress}} [[AsiaFortress Season 3|Season 3]] | ||
| + | | {{LeagueIconSmall|etf2l}} [[ETF2L 6v6 Season 8|Season 8]] | ||
| + | | {{LeagueIconSmall|esea}} [[ESEA-I Season 8|Season 8]] | ||
| + | | {{LeagueIconSmall|ozfortress}} [[OWL 2]] | ||
| + | |- | ||
| + | | {{LeagueIconSmall|asiafortress}} [[AsiaFortress Season 2|Season 2]] | ||
| + | | {{LeagueIconSmall|etf2l}} [[ETF2L 6v6 Season 7|Season 7]] | ||
| + | | {{LeagueIconSmall|esea}} [[ESEA-I Season 6|Season 6]] | ||
| + | | | ||
| + | |- | ||
| + | | | ||
| + | | {{LeagueIconSmall|etf2l}} [[ETF2L 6v6 Season 6|Season 6]] | ||
| + | | | ||
| + | | | ||
| + | |} | ||
| + | |||
| + | == Gallery == | ||
| + | <gallery mode="packed"> | ||
| + | gullywash overview.png|Overview of Gullywash | ||
| + | gullywash callouts.png|Gullywash callouts | ||
| + | gullywash secret.jpg|The area beside the last point, known as "secret" | ||
| + | gullywash water.jpg|The area underneath the last point, known as "water" | ||
| + | </gallery> | ||
| + | |||
| + | == Trivia == | ||
| + | * The callout "water" was named due to the area being filled with water in previous versions of the map | ||
| + | * The callout "river" was named due to a river being outside the windows in the area in previous versions of the map.<ref>[https://www.teamfortress.tv/46351/map-callouts-origins/?page=2#46 map callouts origins]</ref> Additionally, it "leads to water". | ||
| + | * The original name for Gullywash was <code>cp_worselands</code>.<ref>[https://tf2maps.net/threads/gullywash.6254/post-61709 CP - Gullywash | TF2Maps.net]</ref> | ||
| + | |||
| + | == External links == | ||
| + | |||
| + | * [https://tf2maps.net/threads/gullywash.6254/ TF2Maps.net forum thread] | ||
| + | * [https://tf2maps.net/downloads/refresh-cp_gullywash.10615/ TF2Maps.net Refresh forum thread] | ||
| + | * [https://www.teamfortress.tv/57897/refresh-cp-gullywash TeamFortress.tv Refresh forum thread] | ||
| + | * [https://refresh.tf/gullywash Refresh.tf page] | ||
| + | * [https://www.youtube.com/watch?v=xRG3T-6D98s Footage] from [[TLR]] featuring an earlier version of the map, showing the water in "water". | ||
| + | === Resources === | ||
| + | {| class="wikitable sortable emptycells-gray" | ||
| + | ! Resource | ||
| + | ! Link | ||
| + | ! Date | ||
| + | ! Class | ||
| + | ! Author(s) | ||
| + | ! Tournament | ||
| + | |- | ||
| + | ! rowspan=4 | Guides | ||
| + | | [https://youtu.be/ZbHiexB7Xz8 Gullywash Roamer Map Review] | ||
| + | | Oct 12, 2020 | ||
| + | | style="text-align:center" | [[File:Roamericon.png|20px|link=Roaming Soldier]] | ||
| + | | [[marmaloo]] | ||
| + | | | ||
| + | |- | ||
| + | | [https://youtu.be/osRG7Lp_Awc 6s Gullywash Maptalk] | ||
| + | | Jun 12, 2019 | ||
| + | | style="text-align:center" | | ||
| + | | cyanic | ||
| + | | | ||
| + | |- | ||
| + | | [https://youtu.be/m3LC5eN6Ek8 How to TF2 - Scout tips for Gullywash middle] | ||
| + | | Aug 7, 2017 | ||
| + | | style="text-align:center" | [[File:Scouticon.png|20px|link=Scout]] | ||
| + | | [[SVMZI]] | ||
| + | | | ||
| + | |- | ||
| + | | [https://youtu.be/Uxls9QvV674 Cube´s 6vs6 Competitive TF2 Guide - Gullywash Edition] | ||
| + | | Dec 10, 2015 | ||
| + | | style="text-align:center" | | ||
| + | | Cube | ||
| + | | | ||
| + | |- | ||
| + | ! rowspan=2 | Callouts | ||
| + | | [https://youtu.be/_5E-rgWSH6U cp_gullywash callouts] | ||
| + | | May 24, 2017 | ||
| + | | style="text-align:center" | | ||
| + | | rollout.tf | ||
| + | | | ||
| + | |- | ||
| + | | [https://youtu.be/_J6ujFxyrPw Gullywash Map Callouts] | ||
| + | | Jun 10, 2016 | ||
| + | | style="text-align:center" | | ||
| + | | Grizzly Berry | ||
| + | | | ||
| + | |- | ||
| + | ! rowspan=6 | Rollouts | ||
| + | | [https://youtu.be/fppQ9LzACmk cp_gullywash demoman rollout] | ||
| + | | Jul 26, 2016 | ||
| + | | style="text-align:center" | [[File:Demomanicon.png|20px|link=Demoman]] | ||
| + | | rollout.tf | ||
| + | | | ||
| + | |- | ||
| + | | [https://youtu.be/lEqu01r6kHY cp_gullywash roamer rollout] | ||
| + | | Jul 23, 2016 | ||
| + | | style="text-align:center" | [[File:Roamericon.png|20px|link=Roaming Soldier]] | ||
| + | | rollout.tf | ||
| + | | | ||
| + | |- | ||
| + | | [https://youtu.be/8Nam-bhmLyM cp_gullywash scout rollout] | ||
| + | | Jul 23, 2016 | ||
| + | | style="text-align:center" | [[File:Scouticon.png|20px|link=Scout]] | ||
| + | | rollout.tf | ||
| + | | | ||
| + | |- | ||
| + | | [https://youtu.be/nM2tvsi4zFQ cp_gullywash pocket rollout] | ||
| + | | Jul 7, 2016 | ||
| + | | style="text-align:center" | [[File:Pocketicon.png|20px|link=Pocket Soldier]] | ||
| + | | rollout.tf | ||
| + | | | ||
| + | |- | ||
| + | | [https://youtu.be/dqy68uHHlP8 Pocket Rollout Basics: cp_gullywash_final1] | ||
| + | | Apr 13, 2015 | ||
| + | | style="text-align:center" | [[File:Pocketicon.png|20px|link=Pocket Soldier]] | ||
| + | | [[b4nny]] | ||
| + | | | ||
| + | |- | ||
| + | | [https://youtu.be/6L30_coSIuw MGE: Demo#b4nny: Gullywash Demo Rollout] | ||
| + | | Dec 8, 2011 | ||
| + | | style="text-align:center" | [[File:Demomanicon.png|20px|link=Demoman]] | ||
| + | | [[MGE]], b4nny | ||
| + | | | ||
| + | |- | ||
| + | ! rowspan=2 | Tutorials | ||
| + | | [https://youtu.be/kGG8pW724zE cp_gullywash sticky traps] | ||
| + | | May 28, 2017 | ||
| + | | style="text-align:center" | [[File:Demomanicon.png|20px|link=Demoman]] | ||
| + | | rollout.tf | ||
| + | | | ||
| + | |- | ||
| + | | [https://youtu.be/qcZWz-JmVuc cp_gullywash hiding spots & winger jumps] | ||
| + | | May 26, 2017 | ||
| + | | style="text-align:center" | | ||
| + | | rollout.tf | ||
| + | | | ||
| + | |- | ||
| + | ! rowspan=8 | Demo reviews | ||
| + | | [https://youtu.be/vTiOSKFOfn8 Invite Roamer Demo Review on Gullywash with SOOOOOAPYMEiSTER] | ||
| + | | Nov 23, 2021 | ||
| + | | style="text-align:center" | [[File:Roamericon.png|20px|link=Roaming Soldier]] | ||
| + | | [[RGL]], [[SOOOOOAPYMEiSTER]] | ||
| + | | [[RGL Traditional Sixes Season 5]] | ||
| + | |- | ||
| + | | [https://youtu.be/4EDVO6hwEcA?t=3465 Reckoner + Gullywash Demoman POV review (ETF2L Div1, Low)] | ||
| + | | Jul 21, 2021 | ||
| + | | style="text-align:center" | [[File:Demomanicon.png|20px|link=Demoman]] | ||
| + | | [[Mak]] | ||
| + | |- | ||
| + | | [https://youtu.be/ai9qOnoj_RA?t=6856 kaidus demo review s31 grand finals] | ||
| + | | Jul 10, 2019 | ||
| + | | style="text-align:center" | | ||
| + | | [[kaidus]] | ||
| + | | [[EFT2L 6v6 Season 31]] | ||
| + | |- | ||
| + | | [https://youtu.be/qxsnibVLZPY?t=2960 Kaidus Demo Review Upper Bracket Finals] | ||
| + | | Mar 19, 2019 | ||
| + | | style="text-align:center" | | ||
| + | | kaidus | ||
| + | | [[EFT2L 6v6 Season 31]] | ||
| + | |- | ||
| + | | [https://youtu.be/4VTgW1EtEpc Subscriber Demo Review: Shiki (cp_gullywash Pocket POV)] | ||
| + | | Jan 21, 2016 | ||
| + | | style="text-align:center" | [[File:Pocketicon.png|20px|link=Pocket Soldier]] | ||
| + | | b4nny | ||
| + | | [[ESEA Season 20]] | ||
| + | |- | ||
| + | | [https://youtu.be/xh1kZt6cEVg seagull roamer demo review #2] | ||
| + | | Oct 22, 2015 | ||
| + | | style="text-align:center" | [[File:Roamericon.png|20px|link=Roaming Soldier]] | ||
| + | | [[Seagull]] | ||
| + | | [[i52]] | ||
| + | |- | ||
| + | | [https://youtu.be/p15x-DAkURA mike roamer demo review] | ||
| + | | Oct 20, 2015 | ||
| + | | style="text-align:center" | [[File:Roamericon.png|20px|link=Roaming Soldier]] | ||
| + | | Seagull | ||
| + | | [[i55]] | ||
| + | |- | ||
| + | | [https://youtu.be/bUhj_Tk0stE PYYYOUR's Demo Review of Invite Gullywash Matches (Part 1)]<br>[https://youtu.be/4EBFtSqrGjY PYYYOUR's Demo Review of Invite Gullywash Matches (Part 2)] | ||
| + | | Jan 21, 2013 | ||
| + | | style="text-align:center" | [[File:Demomanicon.png|20px|link=Demoman]] | ||
| + | | [[MR SLIN]], [[PYYYOUR]] | ||
| + | | [[ESEA-I Season 13]] | ||
| + | |- | ||
| + | ! rowspan=3 | POVs | ||
| + | | [https://youtu.be/UJ1pSA5Ldxs RGL S4 Week 5B: jayhyunpae POV vs Wonderwall gullywash] | ||
| + | | Oct 24, 2020 | ||
| + | | style="text-align:center" | [[File:Pocketicon.png|20px|link=Pocket Soldier]] | ||
| + | | [[jayhyunpae]] | ||
| + | | [[RGL Traditional Sixes Season 4]] | ||
| + | |- | ||
| + | | [https://youtu.be/Yk-t4zzYBKI b4nny POV: froyotech vs Dorsia (RGL-I S3 Playoffs)] | ||
| + | | Aug 1, 2020 | ||
| + | | style="text-align:center" | [[File:Scouticon.png|20px|link=Scout]] | ||
| + | | b4nny | ||
| + | | [[RGL Traditional Sixes Season 3]] | ||
| + | |- | ||
| + | | [https://youtu.be/wYwUNpAzktA RGL S1 Grand Finals arekk POV Map 2] | ||
| + | | Nov 22, 2019 | ||
| + | | style="text-align:center" | [[File:Scouticon.png|20px|link=Scout]] | ||
| + | | [[arekk]] | ||
| + | | [[RGL Traditional Sixes Season 1]] | ||
| + | |} | ||
| + | |||
| + | == References == | ||
| + | <references /> | ||
| + | |||
| − | {{ | + | {{Navbox/6v6 maps}} |
Latest revision as of 00:12, 13 February 2024
| Gullywash | |
|---|---|
| Map Information | |
| Map type | 5CP |
| Latest version | cp_gullywash_f9
|
| First released | April 9, 2009 |
| Last updated | June 3, 2022 |
| Developer | Jan "Arnold" Laroy |
| Official map | No |
| Download | |
| Competitive Information | |
| Format | 6v6 |
| In rotation | |
Gullywash is a 5CP map created by Jan "Arnold" Laroy. The map was first posted to the TF2Maps.Net forums on April 9, 2009 and was promptly included in ETF2L 6v6 Season 6 later that year. The map has been a staple in the competitive 6v6 scene since then, and was officially added to the game on October 13, 2011.
Gullywash is well-known for its more closed design; featuring only two entrances (choke and big door) to its middle point as opposed to the more popular three entrances. This can often lead to more stalemates and slower play around the second point. In contrast, Gullywash is notorious for its relatively fast-capping last point featuring a flank route underneath the point known as "water".
Contents
Callouts[edit]
Mid point[edit]
| Gullywash mid point callouts |
|---|
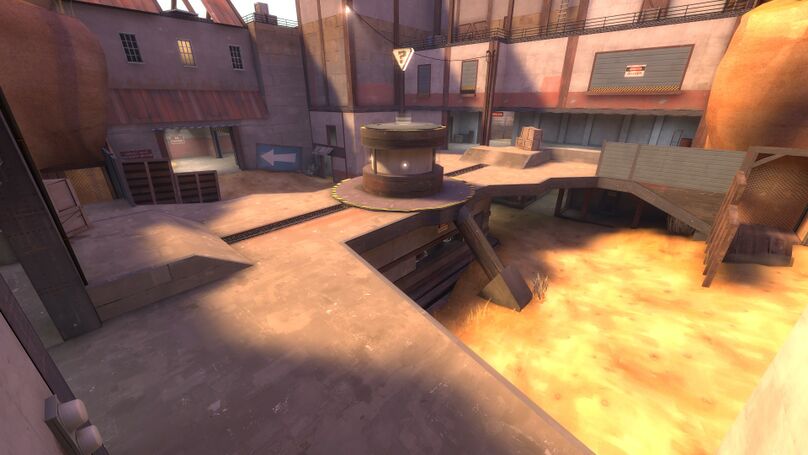
Choke Big Door Dropdown Lower / Yard Elbow / Banana Nipple / Point Ramp / Small Banana Boxes / Crates Top |
Second point[edit]
| Gullywash second point callouts |
|---|
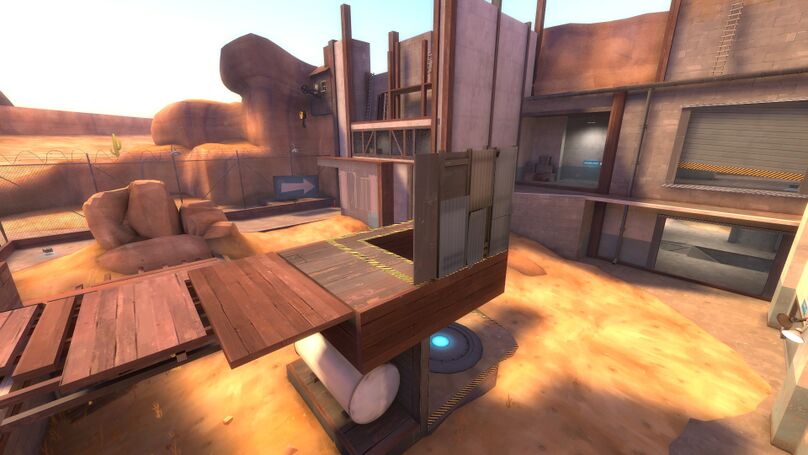
Upper / Balcony Rocks Big Door Lobby / Shutter Choke Second Point |
Lobby[edit]
| Gullywash lobby callouts |
|---|
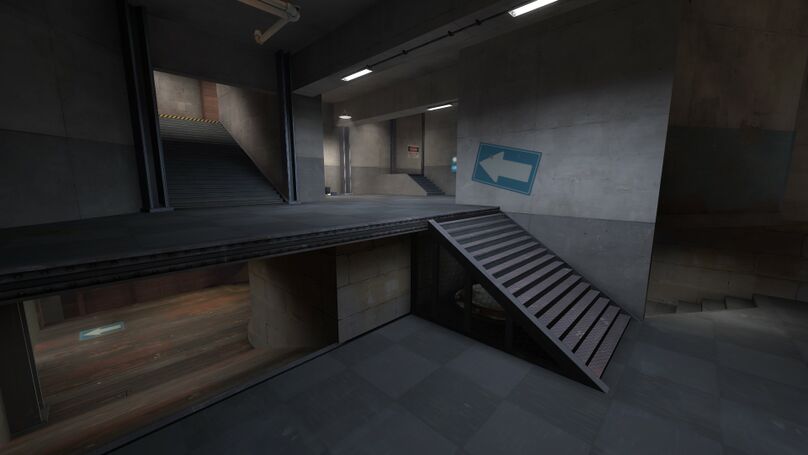
River Balcony / Launchpad Lower Lobby / Wood Main Upper Lobby Shutter / Lockers Lobby |
Last point[edit]
| Gullywash last point callouts (defenders' perspective) |
|---|
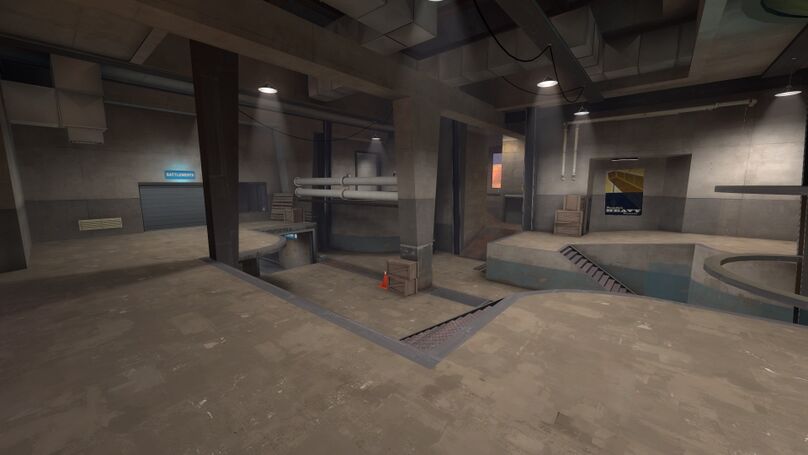
Shutter / Lockers Balcony / Launchpad Left Point Main River Right |
- The area underneath the point is known as "water"
- The area underneath left is known as "secret"
Rollouts[edit]
The Demoman rollout leads to choke, whereas the Roaming Soldier rollout leads to big door with the rest of the team. The Medic will usually go up elbow and meet the Demoman at choke.
Map information[edit]
Gullywash has one of the shortest last point capture times in the competitive map pool, at 3.8 seconds with x1 multiplier. This, combined with the flank routes below and beside the point (water and secret), make Gullywash prone to round-winning backcaps.
| Multiplier | Mid | Second | Last |
|---|---|---|---|
| x1 | 19.00 | 16.00 | 3.80 |
| x2 | 12.67 | 10.67 | 2.53 |
| x3 | 10.36 | 8.73 | 2.07 |
| x4 | 9.12 | 7.68 | 1.82 |
| x5 | 8.32 | 7.01 | 1.66 |
| x6 | 7.76 | 6.53 | 1.55 |
| x7 | 7.33 | 6.17 | 1.47 |
| x8 | 6.99 | 5.89 | 1.40 |
| x9 | 6.72 | 5.66 | 1.34 |
| x10 | 6.49 | 5.46 | 1.30 |
| x11 | 6.29 | 5.30 | 1.26 |
| Control points owned by opposing team | ||||
|---|---|---|---|---|
| 1 | 2 | Neutral | 3 | 4 |
| 8.9 | 8.9 | 8.9 | 8.9 | 8.9 |
| 16 | 6 | 18 | 8 |
Map pool history[edit]
Gullywash has been a staple in the competitive community since its debut in 2009; being very popular in organized tournaments as well as pickup games. It is one of very few maps to have only been dropped from the map pool once (in Oceania for OWL 5). In 2020, the Refresh.tf project began working on Gullywash and released versions of the map with many minor fixes that made it more suited for competitive play. These fixed versions have since been adopted by the community in preference to the official version.
Gallery[edit]
Trivia[edit]
- The callout "water" was named due to the area being filled with water in previous versions of the map
- The callout "river" was named due to a river being outside the windows in the area in previous versions of the map.[1] Additionally, it "leads to water".
- The original name for Gullywash was
cp_worselands.[2]
External links[edit]
- TF2Maps.net forum thread
- TF2Maps.net Refresh forum thread
- TeamFortress.tv Refresh forum thread
- Refresh.tf page
- Footage from TLR featuring an earlier version of the map, showing the water in "water".
Resources[edit]
References[edit]
| 6v6 maps | |
| Currently in rotation | |
| 5CP | |
| KOTH | |
| Previously in rotation | |
| 5CP | Bazillion · Fastlane · Follower · Freight · Kalinka · Logjam · Mainline · Propaganda · Obscure · Reckoner · Sinshine · Warmfront · Waste (CP) · Well (CP) · Wildmire · Yukon |
| Attack/Defend | Dustbowl · Extraction · Gorge · Gravel Pit |
| Capture the Flag | 2Fort · Turbine · Well (CTF) |
| Domination | Standin |
| KOTH | Ashville · Coalplant |
| Payload | Gold Rush |

