Difference between revisions of "Upward"
Bleghfuric (talk | contribs) (minor rewording) |
|||
| (38 intermediate revisions by 15 users not shown) | |||
| Line 1: | Line 1: | ||
{{ambox | {{ambox | ||
|type=content | |type=content | ||
| − | + | |header=Needs Details | |
| − | |header=Needs | + | |smalltext= Some details about attacking/defending third and last are needed. |
| − | |smalltext= | ||
}} | }} | ||
{{NewInfobox Map | {{NewInfobox Map | ||
| Line 13: | Line 12: | ||
|filename=pl_upward | |filename=pl_upward | ||
|version=Official Release | |version=Official Release | ||
| − | | | + | |author1=valve |
| − | + | |author1steam= | |
| − | | | + | |author2= |
| − | | | + | |author2steam= |
| − | | | + | |author3= |
| − | | | + | |author3steam= |
| − | | | + | |released=8 July 2010 |
| − | |released=8 July | + | |updated=7 July 2016 |
| − | |updated= | ||
|official=1 | |official=1 | ||
| Line 27: | Line 25: | ||
|gamemode2= | |gamemode2= | ||
|gamemode3= | |gamemode3= | ||
| − | | | + | |adapted= |
|pro= | |pro= | ||
|popularity=staple | |popularity=staple | ||
|lpleague= | |lpleague= | ||
|lpseason= | |lpseason= | ||
| − | |||
| + | |download=http://fakkelbrigade.eu/maps/pl_upward.bsp | ||
|workshop= | |workshop= | ||
|tf2maps= | |tf2maps= | ||
| Line 47: | Line 45: | ||
}} | }} | ||
'''pl_upward''' is a single-stage [[Payload]] map created by Valve. It was the third Payload map added to the game. Along with [[pl_badwater]], it is considered one of the staple Payload maps played in [[Highlander]]. | '''pl_upward''' is a single-stage [[Payload]] map created by Valve. It was the third Payload map added to the game. Along with [[pl_badwater]], it is considered one of the staple Payload maps played in [[Highlander]]. | ||
| + | It also tops the most amount of inclusions for any highlander map with 28 inclusions across competitions. | ||
| + | |||
== Usage in competitive == | == Usage in competitive == | ||
{{Upward/MapLeagueInclusionTable}} | {{Upward/MapLeagueInclusionTable}} | ||
| Line 52: | Line 52: | ||
== Strategy == | == Strategy == | ||
=== First point === | === First point === | ||
| + | ==== Callouts ==== | ||
| + | {{Map locations | ||
| + | | title = Upward, first point, attackers' perspective | ||
| + | | image = Upward A A1.jpg | ||
| + | | area1 = Blue Rocks | x1=68px | y1=200px | ||
| + | | area2 = Red Rocks | x2=400px | y2=350px | ||
| + | | area3 = Playground | x3=645px | y3=145px | ||
| + | | area4 = Cliff | x4=500px | y4=85px | ||
| + | | area5 = Main | x5=500px | y5=220px | ||
| + | | area6 = Secret | x6=665px | y6=200px | ||
| + | | area7 = Stairs | x7=330px | y7=135px | ||
| + | }} | ||
| + | |||
{{Map locations | {{Map locations | ||
| title = Upward, first point, defenders' perspective | | title = Upward, first point, defenders' perspective | ||
| − | | image = | + | | image = Upward A D1.jpg |
| − | | area1 = | + | | area1 = Behind Roof | x1=200px | y1=250px |
| − | | area2 = | + | | area2 = Roof | x2=300px | y2=165px |
| − | | area3 = | + | | area3 = Blue Rocks | x3=625px | y3=235px |
| − | | area4 = | + | | area4 = Main Spawn | x4=450px | y4=135px |
| − | | area5 = | + | | area5 = Left Spawn | x5=345px | y5=240px |
| + | | area6 = Red Rocks | x6=360px | y6=420px | ||
}} | }} | ||
| Line 66: | Line 80: | ||
| image = pl_upward A2.png | | image = pl_upward A2.png | ||
| area1 = Slope | x1=403px | y1=88px | | area1 = Slope | x1=403px | y1=88px | ||
| − | | area2 = | + | | area2 = Large Ammo | x2=1030px | y2=350px |
| area3 = Cliff | x3=110px | y3=286px | | area3 = Cliff | x3=110px | y3=286px | ||
| area4 = Tunnel | x4=321px | y4=210px | | area4 = Tunnel | x4=321px | y4=210px | ||
| − | | area5 = | + | | area5 = Point | x5=549px | y5=284px |
}} | }} | ||
| + | |||
| + | {{Map locations | ||
| + | | title = Upward, first point, defenders' perspective | ||
| + | | image = pl_upward A1.png | ||
| + | | area1 = Stairs | x1=700px | y1=77px | ||
| + | | area2 = Large Ammo | x2=88px | y2=183px | ||
| + | | area3 = Playground | x3=419px | y3=114px | ||
| + | | area4 = Main | x4=500px | y4=120px | ||
| + | | area5 = Point | x5=446px | y5=251px | ||
| + | | area6 = Red Rocks | x6=500px | y6=50px | ||
| + | | area7 = Behind Playground | x7=250px | y7=240px | ||
| + | | area8 = Below Playground/Cubby | x8=420px | y8=190px | ||
| + | | area9 = Behind Roof | x9=590px | y9=65px | ||
| + | | area10 = Left Spawn | x10=645px | y10=60px | ||
| + | }} | ||
| + | |||
==== Attacking ==== | ==== Attacking ==== | ||
As always on Payload, the attack starts by preparing the [[ÜberCharge]] in spawn and leaving the Medic there for a short period of time while the rest of the team attempt to create an advantage by suiciding. Once an advantage has been created, the team can prepare for a push. | As always on Payload, the attack starts by preparing the [[ÜberCharge]] in spawn and leaving the Medic there for a short period of time while the rest of the team attempt to create an advantage by suiciding. Once an advantage has been created, the team can prepare for a push. | ||
| − | All viable push routes are located in open areas, which leaves the combo vulnerable to [[Sniper]] | + | All viable push routes are located in open areas, which leaves the combo vulnerable to a [[Sniper]] on Playground. Because of that, a Sniper pick is particularly useful on this point, as it allows to avoid a potential death of the Medic. |
Generally, teams decide to push the first point through the cliff area, as most teams' combos will either hold the ground area or the under area. The only difference is the defense's sentry placement: | Generally, teams decide to push the first point through the cliff area, as most teams' combos will either hold the ground area or the under area. The only difference is the defense's sentry placement: | ||
| Line 90: | Line 120: | ||
=== Second point === | === Second point === | ||
| + | ==== Callouts ==== | ||
{{Map locations | {{Map locations | ||
| − | | title = Upward, second point | + | | title = Upward, second point, defenders' perspective |
| image = pl_upward B.png | | image = pl_upward B.png | ||
| area1 = Slope | x1=158px | y1=72px | | area1 = Slope | x1=158px | y1=72px | ||
| − | | area2 = | + | | area2 = Hill | x2=300px | y2=100px |
| − | | area3 = Side | + | | area3 = Side Tunnel | x3=386px | y3=84px |
| − | | area4 = | + | | area4 = Window | x4=479px | y4=95px |
| area5 = Tunnel | x5=362px | y5=183px | | area5 = Tunnel | x5=362px | y5=183px | ||
| − | | area6 = | + | | area6 = Cliff | x6=379px | y6=383px |
| area7 = Shack | x7=646px | y7=288px | | area7 = Shack | x7=646px | y7=288px | ||
| area8 = Platform | x8=638px | y8=137px | | area8 = Platform | x8=638px | y8=137px | ||
| + | | area9 = Point | x9=580px | y9=245px | ||
| + | | area10 = Main | x10=445px | y10=160px | ||
| + | | area11 = Secret | x11=590px | y11=380px | ||
| + | }} | ||
| + | |||
| + | {{Map locations | ||
| + | | title = Upward, second point, attackers' perspective | ||
| + | | image = Upward B A1.jpg | ||
| + | | area1 = Ramp | x1=550px | y1=50px | ||
| + | | area2 = Hill | x2=410px | y2=30px | ||
| + | | area3 = Trench | x3=585px | y3=65px | ||
| + | | area4 = Window/Appartments(Apps) | x4=470px | y4=22px | ||
| + | | area5 = Tunnel | x5=170px | y5=250px | ||
| + | | area6 = Cliff | x6=700px | y6=120px | ||
| + | | area7 = Shack | x7=700px | y7=45px | ||
| + | | area8 = Behind Shack | x8=760px | y8=95px | ||
}} | }} | ||
| + | |||
| + | {{Map locations | ||
| + | | title = Upward, second and third points | ||
| + | | image = Upward BC.jpg | ||
| + | | area1 = Ramp | x1=465px | y1=200px | ||
| + | | area2 = Main | x2=20px | y2=130px | ||
| + | | area3 = Trench | x3=200px | y3=380px | ||
| + | | area4 = Window/Appartments(Apps) | x4=95px | y4=45px | ||
| + | | area5 = Sewer | x5=400px | y5=180px | ||
| + | | area6 = House | x6=280px | y6=80px | ||
| + | | area7 = Platform | x7=250px | y7=105px | ||
| + | | area8 = Rollercoaster | x8=710px | y8=55px | ||
| + | | area9 = Point | x9=30px | y9=225px | ||
| + | }} | ||
| + | |||
==== Attacking ==== | ==== Attacking ==== | ||
After capturing the first point, the attackers should prepare for a push on the second point, while the flank classes should attempt to get the cart as close to the tunnel exit as possible. The attacking team usually holds somewhere between the cliff entrance and the side tunnel, but in doing that they need to be wary of the enemy Sniper, call his positions out accordingly and try to spam him out. | After capturing the first point, the attackers should prepare for a push on the second point, while the flank classes should attempt to get the cart as close to the tunnel exit as possible. The attacking team usually holds somewhere between the cliff entrance and the side tunnel, but in doing that they need to be wary of the enemy Sniper, call his positions out accordingly and try to spam him out. | ||
| Line 118: | Line 180: | ||
=== Third point === | === Third point === | ||
| + | ==== Callouts ==== | ||
{{Map locations | {{Map locations | ||
| title = Upward, third point | | title = Upward, third point | ||
| image = pl_upward C.png | | image = pl_upward C.png | ||
| − | | area1 = Sewer | x1= | + | | area1 = Sewer | x1=190px | y1=215px |
| − | | area2 = | + | | area2 = Catwalk | x2=280px | y2=120px |
| − | | area3 = | + | | area3 = Elbow | x3=515px | y3=110px |
| − | | area4 = | + | | area4 = Platform | x4=430px | y4=95px |
| − | | area5 = | + | | area5 = Point | x5=550px | y5=183px |
| − | | area6 = Under | + | | area6 = Under | x6=425px | y6=270px |
| − | | area7 = C | + | | area7 = Shithouse/C Hut | x7=706px | y7=160px |
| + | | area8 = Rollercoaster | x8=540px | y8=320px | ||
| + | | area9 = Main | x9=424px | y9=140px | ||
| + | | area10 = Ramp | x10=125px | y10=220px | ||
| + | | area11 = House | x11=280px | y11=160px | ||
| + | | area12 = Trench | x12=50px | y12=230px | ||
| + | | area14 = Far Back | x14=585px | y14=70px | ||
}} | }} | ||
| − | + | ||
==== Defending ==== | ==== Defending ==== | ||
| − | === | + | The attacking team will likely push with their combo up the hill under bridge while having the scout and engineer push the cart as far as they can. The demoman is a key class for defending this point, as he can spam both the hill and the tracks leading up to the third point. A more aggressive sentry spot that can be effective when the cart has not been pushed very far is on outside, as it can deny the hill. However, extensive use of the wrangler will be required to fire at those pushing the cart. When the cart has been pushed past the bridge, the best spot to place the sentry is back on the flat section of track leading up to last. This spot helps defend the third point from being captured. It is important to watch out for attacking players flanking through under tracks and into C hut. |
| + | |||
| + | === Fourth point === | ||
| + | ==== Callouts ==== | ||
| + | {{Map locations | ||
| + | | title = Upward, fourth point, defenders' perspective | ||
| + | | image = pl_upward D.png | ||
| + | | area1 = Straight Stairs | x1=270px | y1=40px | ||
| + | | area2 = Casual / Pub Spot | x2=700px | y2=100px | ||
| + | | area3 = Point | x3=160px | y3=270px | ||
| + | | area4 = Lower Spawn | x4=785px | y4=240px | ||
| + | | area5 = Under | x5=460px | y5=215px | ||
| + | | area6 = Dropdown | x6=220px | y6=140px | ||
| + | | area7 = Main | x7=490px | y7=100px | ||
| + | | area8 = Upper / Tiles | x8=205px | y8=75px | ||
| + | | area9 = Spiral Stairs | x9=585px | y9=60px | ||
| + | | area10 = Secret | x10=210px | y10=400px | ||
| + | }} | ||
| + | |||
| + | {{Map locations | ||
| + | | title = Upward, fourth point, attackers' perspective | ||
| + | | image = pl_upward D2.png | ||
| + | | area1 = Casual / Pub Spot | x1=75px | y1 = 200px | ||
| + | | area2 = Balcony | x2=370px | y2=130px | ||
| + | | area3 = Lower Spawn | x3=250px | y3=220px | ||
| + | | area4 = Toxic | x4=530px | y4=180px | ||
| + | | area5 = Crates | x5=750px | y5=140px | ||
| + | | area6 = Under | x6=240px | y6=410px | ||
| + | | area7 = Secret | x7=650px | y7=350px | ||
| + | | area8 = Point | x8=775px | y8=405px | ||
| + | }} | ||
| + | |||
==== Attacking ==== | ==== Attacking ==== | ||
| + | |||
| + | The fourth point is generally considered the hardest point to push in both a casual and competitive setting. In Highlander, some teams may elect to hold '''tiles''' on defense, in which case have your combo originate spiral, along with soldier and occasionally scout. Your combo should push '''under''' with demo-pyro uber up the stairs and into tiles, meanwhile heavy and soldier wait in '''spiral''', pushing in the post-exchange for a pincer attack. Teams may also sack waves into tiles if at full uber disadvantage. | ||
| + | |||
| + | After tiles is taken, you must break the "pub hold". To achieve this, you must effectively spawn camp or completely wipe out the enemy team. Furthermore, breaking this hold should be approached as a step by step process: | ||
| + | * Get your sniper into tiles. | ||
| + | * Spam and kill the enemy sentry with coordination. While demoman and soldier are best at this, spy's enforcer and sniper's charged shots can help finish the job. | ||
| + | * Take an uber exchange through tracks or dropping down from tiles, focusing damage on '''pub spot''' and '''balcony'''. Some teams even have their demoman jump onto pub spot, putting their backs against the rail in order to maintain the uber connection with their medic. | ||
| + | * For the post-uber exchange, your soldier should get a full overheal and jump on to balcony, denying the enemy combo from stopping the cart. In the mean time, your sniper will now have a lot of space and assist in denial. At this point, you can now send miscellaneous players such as engineer, scout, and heavy to cap the cart. Demoman can move forward and use sticky traps on the lower spawn doors, further buying time for the payload capture. | ||
| + | |||
==== Defending ==== | ==== Defending ==== | ||
| − | {{Maps | + | While it is an older meta and has fallen out of use at higher levels, the '''tiles''' hold can be incredibly tough to break if an offense isn't ready for it. Typically a soldier will be holding spiral, a heavy will be holding stairs, and a demo will rotate in between the two, with the rest of the combo holding more passively in tiles. Keep in mind that is generally not advised for your team to hold here if are late to back out of the third point or you lose players, especially because of how difficult it is for spawning players to get back with their team. |
| − | + | ||
| − | + | The more standardized "pub hold" is notoriously difficult to push against, making it the more reliable option for most teams. Your combo controls the high ground via '''pub spot''', assisted with a leveled sentry and sniper on '''balcony'''. Your engineer can also place a dispenser on the stairs near toxic, which can prevent the spy from getting up entirely if placed correctly. In the mean time, your flank players can help control the low ground and even push through lower to get kills in tiles. If the cart is close, it is also viable to have a heavy sit in secret and peek when they see the payload being pushed. | |
| + | |||
| + | {{Active Maps Navbox}}{{All Maps Navbox|y}} | ||
Latest revision as of 00:27, 18 November 2024
pl_upwardpl_upward is a single-stage Payload map created by Valve. It was the third Payload map added to the game. Along with pl_badwater, it is considered one of the staple Payload maps played in Highlander. It also tops the most amount of inclusions for any highlander map with 28 inclusions across competitions.
Contents
Usage in competitive[edit]
| Highlander | ||||||||
|---|---|---|---|---|---|---|---|---|
| pl_upward | Season 20 | Season 11 | ||||||
| Season 19 | Season 10 | |||||||
| Season 18 | Season 9 | |||||||
| Season 17 | Season 8 | |||||||
| Season 16 | Season 7 | |||||||
| Season 15 | Season 6 | |||||||
| Season 14 | Season 5 | |||||||
| Season 13 | Season 4 | |||||||
| Season 12 | Season 3 | |||||||
| Season 11 | Season 2 | |||||||
| Season 10 | Season 1 | |||||||
| Season 9 | ||||||||
| Season 8 | ||||||||
| Season 6 | ||||||||
| Season 5 | ||||||||
| Season 4 | ||||||||
| Season 3 | ||||||||
| Total inclusions | 17 out of 39 | 11 out of 30 | ||||||
Bold italics denotes the current or latest season
| Official map | |
Strategy[edit]
First point[edit]
Callouts[edit]
| Upward, first point, attackers' perspective |
|---|
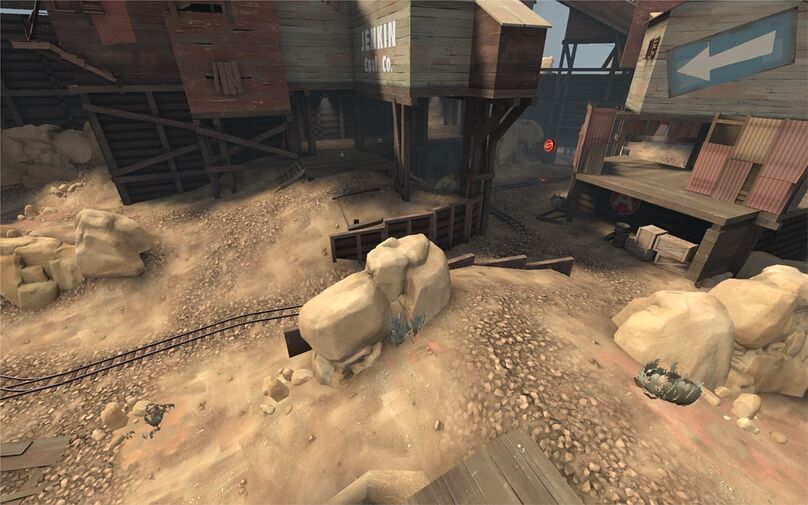
Blue Rocks Red Rocks Playground Cliff Main Secret Stairs |
| Upward, first point, defenders' perspective |
|---|
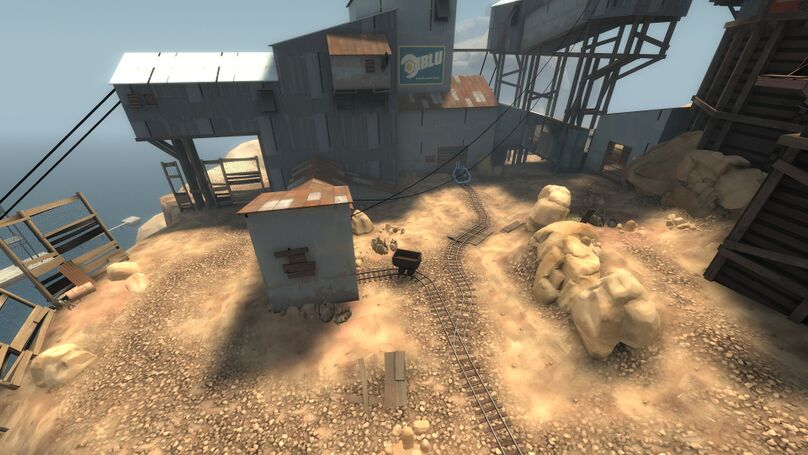
Behind Roof Roof Blue Rocks Main Spawn Left Spawn Red Rocks |
| Upward, first point, attackers' perspective |
|---|
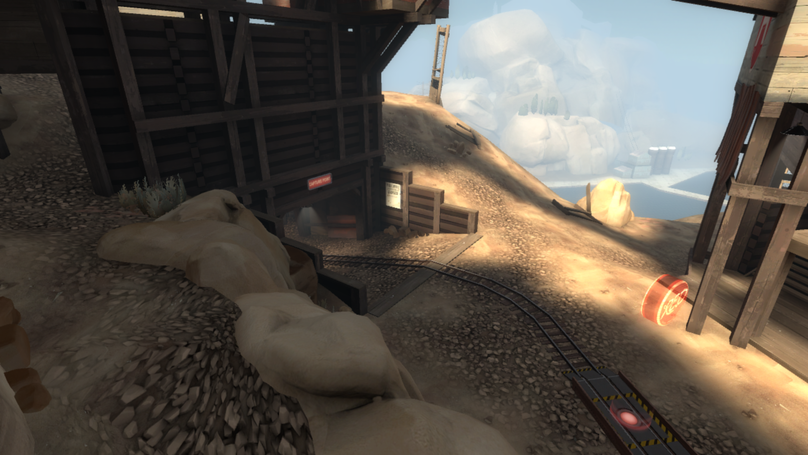
Slope Large Ammo Cliff Tunnel Point |
| Upward, first point, defenders' perspective |
|---|
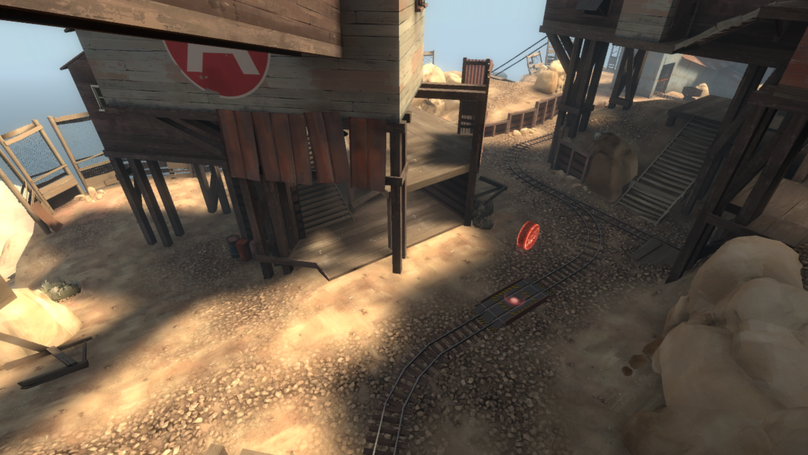
Stairs Large Ammo Playground Main Point Red Rocks Behind Playground Below Playground/Cubby Behind Roof Left Spawn |
Attacking[edit]
As always on Payload, the attack starts by preparing the ÜberCharge in spawn and leaving the Medic there for a short period of time while the rest of the team attempt to create an advantage by suiciding. Once an advantage has been created, the team can prepare for a push.
All viable push routes are located in open areas, which leaves the combo vulnerable to a Sniper on Playground. Because of that, a Sniper pick is particularly useful on this point, as it allows to avoid a potential death of the Medic.
Generally, teams decide to push the first point through the cliff area, as most teams' combos will either hold the ground area or the under area. The only difference is the defense's sentry placement:
- If the sentry is located in under, it forces the combo to use the ÜberCharge earlier, somewhere around the point area, to take it down. The main objective is to take the sentry down, as it allows for a point capture.
- If the sentry is located on the slope, a team can attempt to flank the enemy by going directly through the entrance on the cliff and using the ÜberCharge closer to the Sentry Gun. If the enemy combo is unaware of the push, it cuts off their only viable escape route. The downside of this push is that if the Pyro is guarding the entrance, the ÜberCharged players can be easily knocked off the cliff. Going up to the sentry also takes longer, which means there's an elevated risk of a force or even a drop.
Defending[edit]
Due to the openness of the point, the defenders need to be particularly wary of jumping classes and sightlines. This means it's hard to establish a permanent hold on this point, so the defenders should seek only to delay the attackers.
The sentry's positioning is particularly important, as it shapes up the defense's game plan:
- Placing the sentry under means that its purpose is to deny the flank by making it impossible to capture the point before it's taken down. That means the sentry will be the first to go down after an enemy ÜberCharge, and once it's down, the defending team leaves the point, unless the attackers overcommit and lose too many players.
- Placing the sentry on slope means that it is a buffer zone. Once the enemy combo uses the ÜberCharge, the defenders can just back up to the sentry and then decide to either back out completely or go back in if possible. It allows to save the ÜberCharge for later, but the defenders need to be wary of the wrap-around push described above.
It's important to remember that the slope is the only viable escape route for the combo, as the tunnel area is easy to spam. The defenders need to keep that in mind and move early enough to be able to back out in time.
Second point[edit]
Callouts[edit]
| Upward, second point, defenders' perspective |
|---|
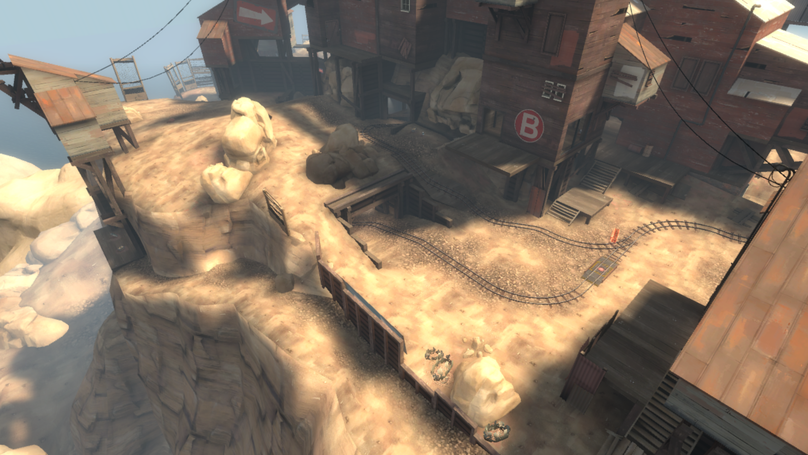
Slope Hill Side Tunnel Window Tunnel Cliff Shack Platform Point Main Secret |
| Upward, second point, attackers' perspective |
|---|
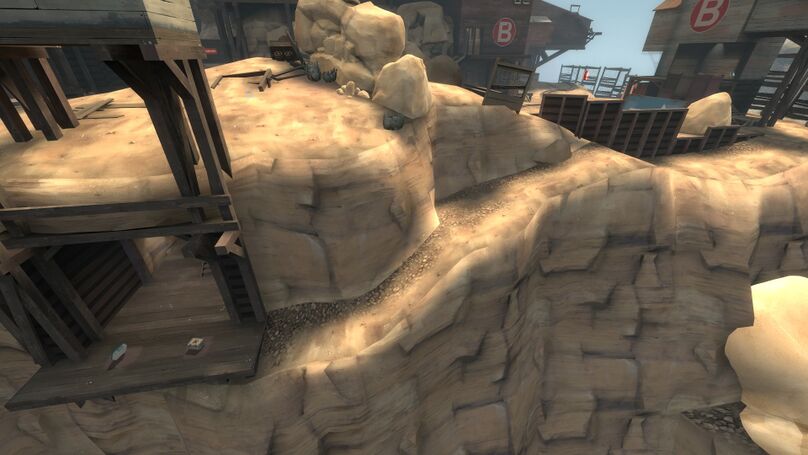
Ramp Hill Trench Window/Appartments(Apps) Tunnel Cliff Shack Behind Shack |
| Upward, second and third points |
|---|
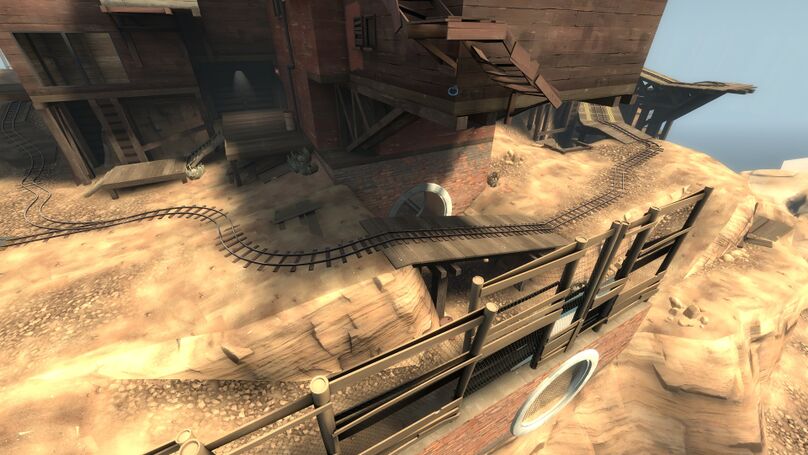
Ramp Main Trench Window/Appartments(Apps) Sewer House Platform Rollercoaster Point |
Attacking[edit]
After capturing the first point, the attackers should prepare for a push on the second point, while the flank classes should attempt to get the cart as close to the tunnel exit as possible. The attacking team usually holds somewhere between the cliff entrance and the side tunnel, but in doing that they need to be wary of the enemy Sniper, call his positions out accordingly and try to spam him out.
Choosing a push depends on how close the defenders choose to hold.
- If the opposing Heavy and Medic are holding inside the house, the primary objective is to take it back, as it provides obvious height advantage and is close to both the sentry and the RED spawn. This hold is very hard to break however, as it is pretty much impossible to force the enemy combo while it's holding inside the house, therefore it's very important that the other attackers try to create a player advantage that would force the enemy to back out.
- If the defenders are holding the platform area, taking the point is much easier; a push through the house is almost impossible to defend and will pretty much always mean that the Sentry will go down and the enemy Medic will either die or use the ÜberCharge to get out.
As this is one of the major holds on the map, some teams will often overcommit and lose many players when defending. If that happens, it's vital to capitalise on this and spawncamp as much as possible, and push up quickly after the point is captured, to try and get the next point unopposed.
Defending[edit]
After the enemy team takes control of the first point, the combo should immediately take position on platform and holding there. Holding near rocks is too dangerous due to being so wide open to snipers and jumping classes. Generally the heavy sits on platform while the Demoman takes position closer to the tracks so he can spam the window, behind the rocks or into tunnel.
Once the enemy team pops uber onto the sentry the combo can back up into the house behind platform, and either back up to third, or counter-pop and attempt to take control back of the area. Depending on what the team decides, you may want your spy to watch the entrance to house and call out when the enemy combo move through there. Then your combo can attempt to kill the enemy combo preemptively.
Third point[edit]
Callouts[edit]
| Upward, third point |
|---|
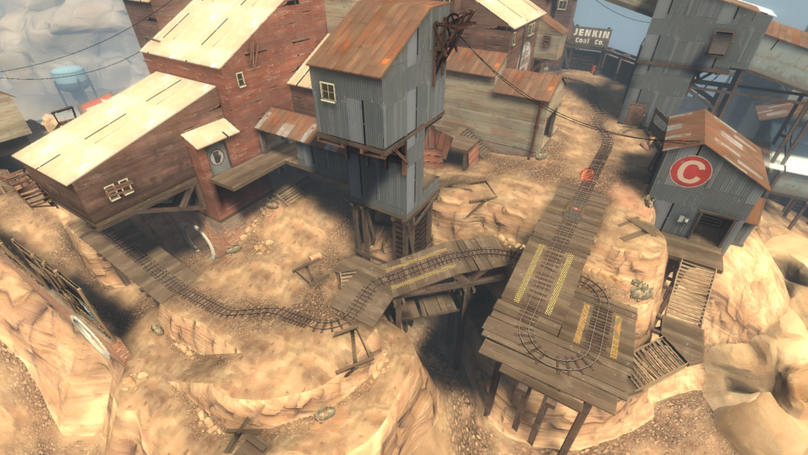
Sewer Catwalk Elbow Platform Point Under Shithouse/C Hut Rollercoaster Main Ramp House Trench Far Back |
Defending[edit]
The attacking team will likely push with their combo up the hill under bridge while having the scout and engineer push the cart as far as they can. The demoman is a key class for defending this point, as he can spam both the hill and the tracks leading up to the third point. A more aggressive sentry spot that can be effective when the cart has not been pushed very far is on outside, as it can deny the hill. However, extensive use of the wrangler will be required to fire at those pushing the cart. When the cart has been pushed past the bridge, the best spot to place the sentry is back on the flat section of track leading up to last. This spot helps defend the third point from being captured. It is important to watch out for attacking players flanking through under tracks and into C hut.
Fourth point[edit]
Callouts[edit]
| Upward, fourth point, defenders' perspective |
|---|
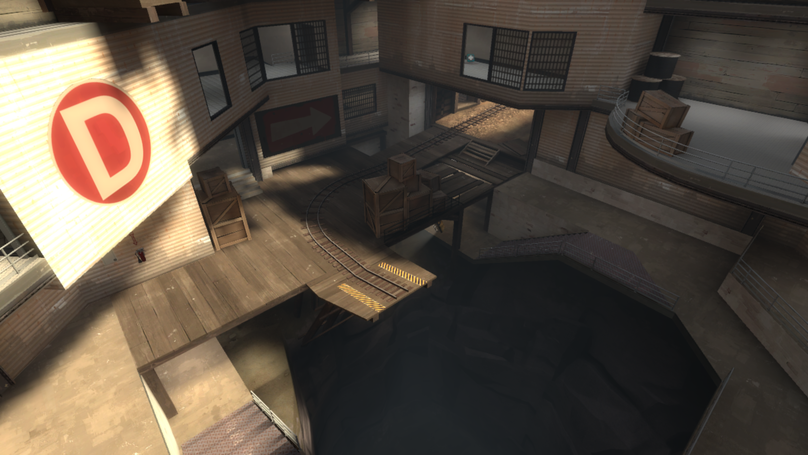
Straight Stairs Casual / Pub Spot Point Lower Spawn Under Dropdown Main Upper / Tiles Spiral Stairs Secret |
| Upward, fourth point, attackers' perspective |
|---|
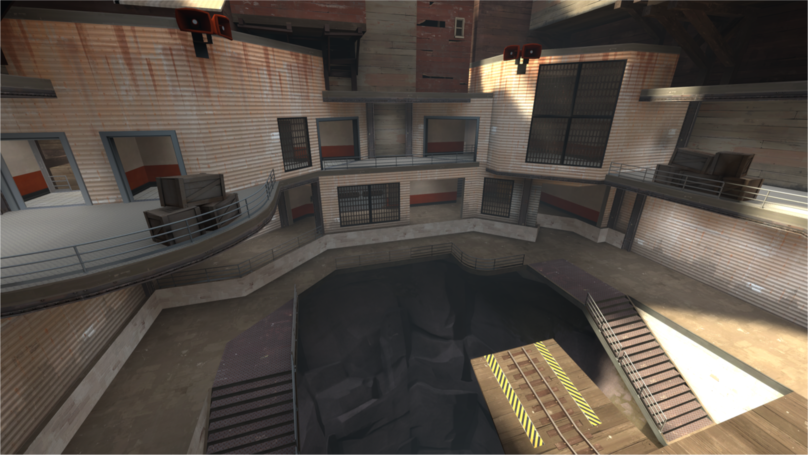
Casual / Pub Spot Balcony Lower Spawn Toxic Crates Under Secret Point |
Attacking[edit]
The fourth point is generally considered the hardest point to push in both a casual and competitive setting. In Highlander, some teams may elect to hold tiles on defense, in which case have your combo originate spiral, along with soldier and occasionally scout. Your combo should push under with demo-pyro uber up the stairs and into tiles, meanwhile heavy and soldier wait in spiral, pushing in the post-exchange for a pincer attack. Teams may also sack waves into tiles if at full uber disadvantage.
After tiles is taken, you must break the "pub hold". To achieve this, you must effectively spawn camp or completely wipe out the enemy team. Furthermore, breaking this hold should be approached as a step by step process:
- Get your sniper into tiles.
- Spam and kill the enemy sentry with coordination. While demoman and soldier are best at this, spy's enforcer and sniper's charged shots can help finish the job.
- Take an uber exchange through tracks or dropping down from tiles, focusing damage on pub spot and balcony. Some teams even have their demoman jump onto pub spot, putting their backs against the rail in order to maintain the uber connection with their medic.
- For the post-uber exchange, your soldier should get a full overheal and jump on to balcony, denying the enemy combo from stopping the cart. In the mean time, your sniper will now have a lot of space and assist in denial. At this point, you can now send miscellaneous players such as engineer, scout, and heavy to cap the cart. Demoman can move forward and use sticky traps on the lower spawn doors, further buying time for the payload capture.
Defending[edit]
While it is an older meta and has fallen out of use at higher levels, the tiles hold can be incredibly tough to break if an offense isn't ready for it. Typically a soldier will be holding spiral, a heavy will be holding stairs, and a demo will rotate in between the two, with the rest of the combo holding more passively in tiles. Keep in mind that is generally not advised for your team to hold here if are late to back out of the third point or you lose players, especially because of how difficult it is for spawning players to get back with their team.
The more standardized "pub hold" is notoriously difficult to push against, making it the more reliable option for most teams. Your combo controls the high ground via pub spot, assisted with a leveled sentry and sniper on balcony. Your engineer can also place a dispenser on the stairs near toxic, which can prevent the spy from getting up entirely if placed correctly. In the mean time, your flank players can help control the low ground and even push through lower to get kills in tiles. If the cart is close, it is also viable to have a heavy sit in secret and peek when they see the payload being pushed.
| List of active competitive Team Fortress 2 maps | |
| 3CP | Warmfrost |
| 5CP | Badlands · Granary Pro · Gullywash · Metalworks · Process · Reckoner · Snakewater · Sunshine · Villa |
| Attack/Defend | Steel |
| King of the Hill | Airfield · Ashville · Bagel · Brazil · Cascade · Clearcut · Coalplant · Lakeside · Product · Warmtic |
| Payload | Badwater · Borneo · Swiftwater · Upward · Vigil |
