Badwater Pro

pl_badwater_pro_v12pl_badwater_pro is a single-stage Payload map originally created by Valve and modified by lep to improve gameplay for the competitive community.
Contents
Usage in competitive[edit]
| Highlander | ||||||||
|---|---|---|---|---|---|---|---|---|
| Season 35 | ||||||||
| Season 32 | ||||||||
| Season 31 | ||||||||
| Season 30 | ||||||||
| Season 27 | ||||||||
| Season 24 | Season 27 | |||||||
| Season 22 | ||||||||
| Season 21 | Season 21 | |||||||
| Season 18 | Season 20 | |||||||
| Season 17 | ||||||||
| Season 16 | ||||||||
| Total inclusions | 10 out of 39 | 4 out of 30 | ||||||
| Official map | |
| Pro version |
Strategy[edit]
First point[edit]
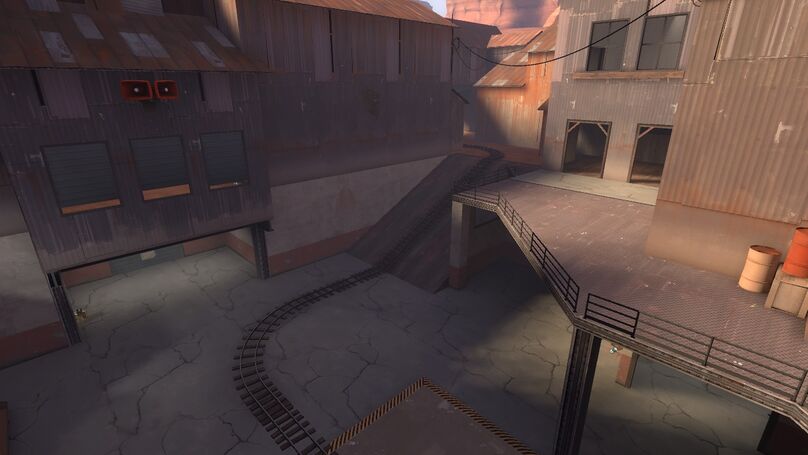
| Badwater Basin — The first point |
|---|
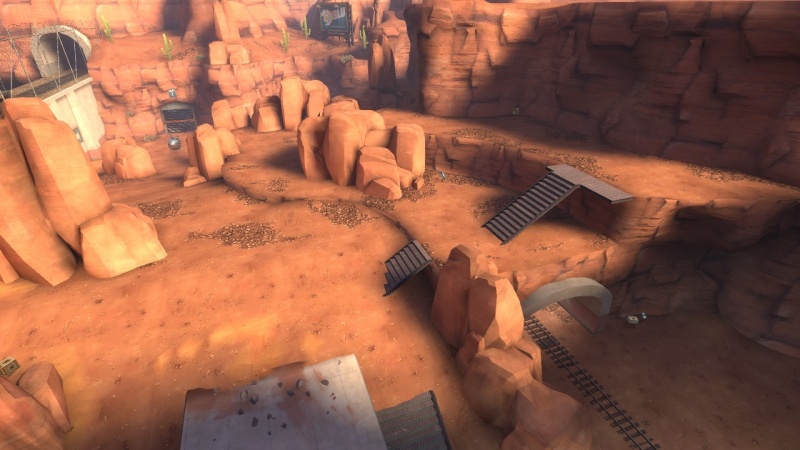
Rocks Cliff Middle Slope Top Tunnel |
Attacking[edit]
The round begins with the usual suicides, while the Medic waits in spawn with his ÜberCharge. A particularly important pick on this stage is the defending Pyro, who can easily deny all viable push routes with his airblast.
The ÜberCharge should be used once the cart is near the exit of the tunnel below the top area; the sentry will be overlooking that area, so taking it down is a priority. A team can decide to push from the following routes:
- The cliff — It's not an advisable route if the enemy Pyro is alive, as the ÜberCharged players can be easily airblasted off the ledge, rendering the Über useless. It is however a good idea, if the Pyro is down and the attacking team has a player advantage.
- Middle — The route to middle begins similarly to the cliff route, except for dropping down just over the tunnel's entry instead of going straight up to cliff. This route is probably the best choice if the enemy Pyro is not dead, and the ÜberCharge situation is even.
- Slope — The slope can be a good way to push this point, but it takes a long time to get to the enemy combo. Moreover, the slope is a huge Sniper sightline, which could either cause the ÜberCharge to be deployed early enough to be unable to take advantage to it, or the Medic could simply drop to a fully-charged bodyshot or a headshot.
- Tunnel — Probably the worst way to go on this point due to the huge height disadvantage.
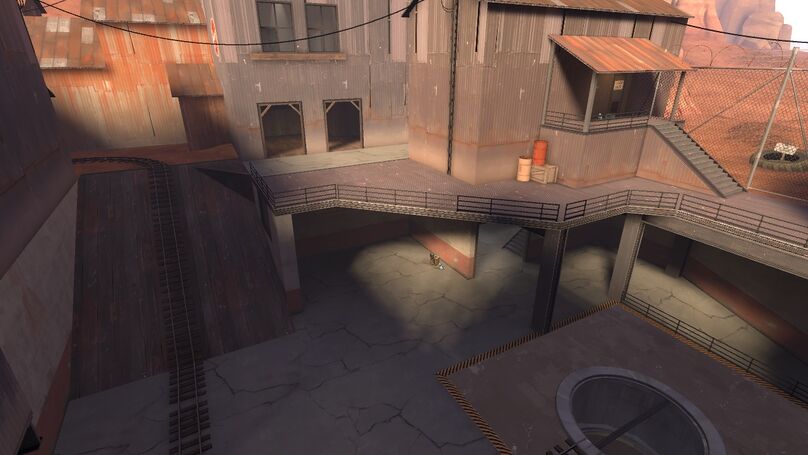
Defending[edit]
As usual on Payload, the defensive team's aim is to hold back the attackers as long as possible, without overcommitting to the defense of the point. Usually, when a team has neither an ÜberCharge, nor a Sentry Gun, it will back up to the next point.
Stopping an enemy push should be easy enough with the Pyro, if the situation is even. It is extremely important for the Pyro to survive, as he can make or break a defense.
The defenders need to watch out so that the cart doesn't reach the Control Point if they are holding in the usual spot up top. Due to that, a team will usually devote a Scout or a Sniper to watch the tunnel area. If the enemy combo decides to use the ÜberCharge inside the tunnel, simply dropping down an übered Heavy-Medic combo should stop the push.
The only escape route on this point is following the railtracks, so the defenders need to make sure to get away early to avoid losing players on the way out, which due to the respawn times being longer on defense, might prevent them from being able to effectively defend the next point.
Second point[edit]
| Badwater Basin — The second point |
|---|
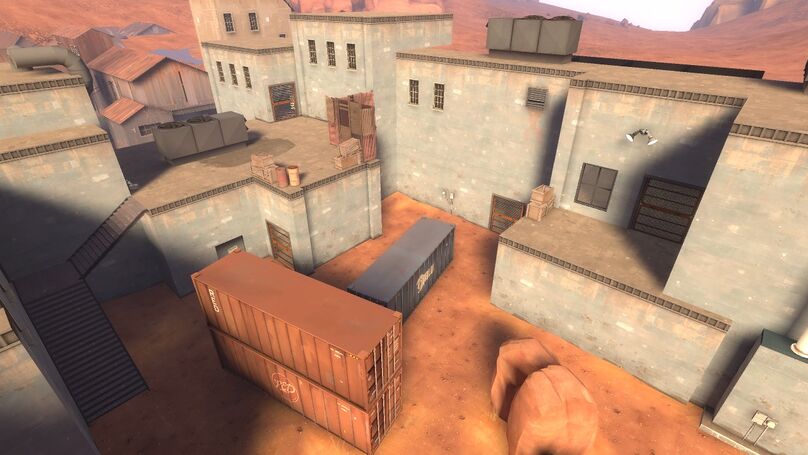
Stairs Roof Back stairs Back entrance Flank |
Despite the cart moving through the area below the roof, just in front of it, actually no fighting takes place there. The only classes that might be down below during a stalemate are the pushing BLU classes and the RED sniper.
Attacking[edit]
Assuming a stalemate situation, an attacking team will seek to build the ÜberCharge while suiciding its players to try to get an advantage until the Medic is around 80%. The nature of this point, including the huge height advantage, renders any kind of push on the cart useless; the attackers are pretty much required to take the roof to advance.
The huge flank area behind the roof might help any bombing players, as they can easily cover the distance via explosive jumping, and it's the only way to attempt a suicide play on the enemy combo. It also holds two medium healthpacks, one in the room in the back and one in the corner of the fence.
There are two viable pushing routes on this point:
- Stairs — The viability of this push depends mainly on whether or not the Pyro is alive. Due to the fact that this route leads through a very narrow entrance, it is very easy to be stopped from entering the roof. Advised only when pushing with momentum.
- Back stairs — This way requires going through the back entrance to the back stairs and walking up. The Demoman can stay on the bottom on the stairs and simply fire his explosives, while the Pyro and the Heavy advance with the Medic. If the back stairs aren't watched by the defenders, it makes for a very good push. It is pretty much the best available choice.
If the enemy team lost a lot of players on the first point, it is a good idea to push up the combo to the first RED spawn door and basically spawn camp the enemy, forcing them to take the longer route and lose the second point without contest.
Defending[edit]
Acquiring the roof is crucial to attempting any kind of defense. If your team cannot get on the roof in time, it's simply wiser to attempt a third point defense instead. The sentry should be positioned on the ledge of the roof, to deny all players trying to push the cart.
Once again, it is very key for the Pyro to stay up at all times, as he excels while he has a height advantage over the attacking combo. Another important aspect of this point is making sure the flank area is being watched at all times, as the attackers might attempt to kill the Medic by bombing.
If the enemy team used their ÜberCharge, and the defending Medic is on about 85-90%, he can retreat through the back stairs and then towards the cart, just to double-back and go up again when the enemy über fades, cleaning up all the attackers and perhaps reacquiring the roof.
Third point[edit]
| Badwater Basin — The third point, defenders' perspective |
|---|
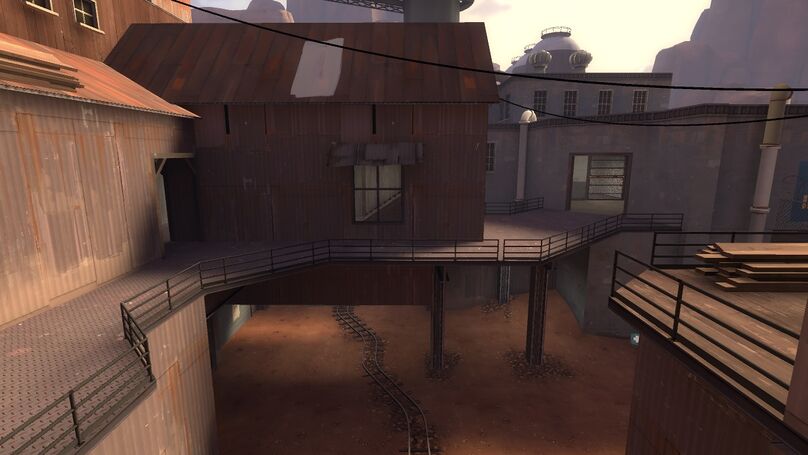
House Choke Boiler room Top |
| Badwater Basin — The third point, attackers' perspective |
|---|
Top Window C sign Corner |
Attacking[edit]
The third point is considerably separated from the two previous ones. There are just three entries into this point, two of which are vulnerable to spam, and the third is too open to consider pushing from. This means going without an ÜberCharge is very much unadvisable.
The attacking team can choose one of the three locations to push:
- House — This route is unadvisable if the enemy Pyro is alive, for reasons similar to the second point's stairs. A team should not actively hold the house - it's an enclosed space, vulnerable to splash damage; the attackers should go through the house as quickly as possible to avoid getting caught out.
- Choke — Although it's quite a ways off from the combo will hold and where the sentry will be, it's probably the best bet for an attacking team. The main objective of the ÜberCharge should be to get down the sentry, which will most likely be placed in the window up top, as it stops any kind of progress. Then, the rest of the team can flood in and maybe swarm the opponent.
- Boiler room — The openness of this route will force you to use the ÜberCharge early, and the entrance is even farther away from the defenders than the choke. Not advised.
Suicides are very tough on this point, as there are no good flanking routes. On the contrary, if the Engineer uses the window sentry, he might be vulnerable to Spies, and if the Pyro is with the Engineer, that puts the combo at risk. Any successful attempt on either of them is an immediate cue to push as soon as possible.
Defending[edit]
This point is even better than the previous ones to defend, due to a multitude of reasons, some of which were outlined in the Attacking section.
The defenders can hold in two places:
- By the house window — The Medic stands with his back to the window, making him impossible to backstab, while the Heavy and the Demoman watch the inside of the house and the boiler room. The better the team coordination is, the stronger this hold becomes. It has one flaw though; the enemy Demoman can shoot grenades over the roof, which can catch the Medic and cause him to die or drop.
- By the stairs — This spot requires less coordination, but makes the defenders lose the height advantage. This can be countered by closely watching the house and reacting to enemy ÜberCharges immediately.
There are also two sentry positions:
- In the window — As the window overlooks the entirety of the point, it is a very good position, especially with the Wrangler. On the flipside, it causes the Engineer to be separated from the rest of his team, which make him vulnerable to attacking Spies. This can be remedied by devoting the Pyro to spychecking, but it causes him to be less effective, as he has to watch out for both the Engineer and the Sentry.
- By the C sign — This sentry doesn't cover a lot of ground, but still stops the attackers from capturing the point. This spot is used by teams who don't want to devote the Pyro to the Engineer.
If the defenders are pushed out to the corner, it is pretty much impossible to defend the third point any longer. The defending team should back up to the last point.
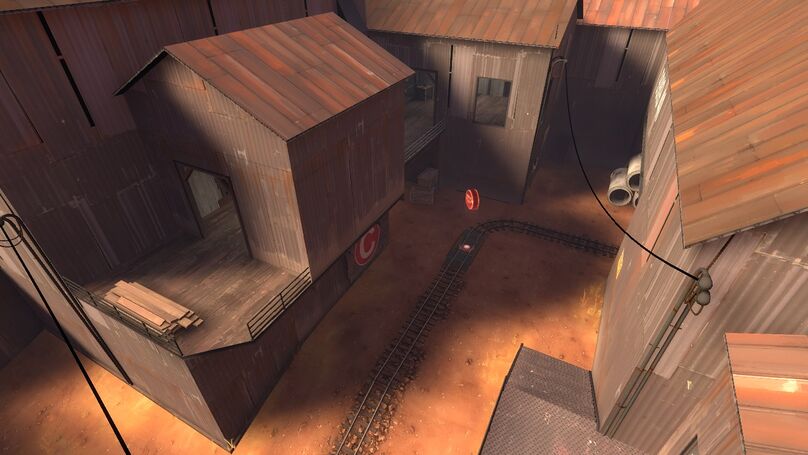
Fourth point[edit]
| Badwater Basin — The fourth point (1) |
|---|
Ramp Flank / Tireside Top Under Map room Bottom |
| Badwater Basin — The fourth point (2) |
|---|
Ramp Bottom Stairs Flank / Tireside Top |
Attacking[edit]
The fourth point gives a bit more leeway when trying to push than the previous point. There are a couple of ways of attacking the last point:
- Through choke — This push is suitable when the opponent's not holding on the ramp. In that case, you can safely activate the ÜberCharge late, which gives you more time to take down enemy targets. It will however fail if the opponent's holding close.
- Through map room — Regardless of the enemy's positioning, this push is perhaps the most preferable one; when the enemy's holding choke close, going through map room will cause them to be separated from the team; when the enemy's closing far back, this push allows to über late without much risk. The only caveat is, most teams will have a player watching the map room, so to execute this push successfully, the attackers will have to go as quickly as possible.
- Through flank, dropping down from top — Completely avoids all the enemies, however, if the sentry isn't down, dropping down on it will cause the übered players to fly away, and will essentially render the über useless.
The flank classes can utilise the stairs to try and get a pick in a moment of confusion.
Defending[edit]
On defense, teams utilise the following two holds:
- On the ramp — This hold is supposed to deny the opponent the choke. The Heavy and the Medic stand on the ramp, by the wall, while the Demoman stays on top of the ramp and fires his explosives, trying to put out as much damage as possible. This hold is very offensive-minded, and should not be performed by teams with worse coordination.
- On the bottom — This is a more passive hold, used by lower teams or as a "last stand" of sorts. The combo holds by the sentry gun. In this position the map room push isn't as dangerous, but the team still needs to look out for the combo.
The sentry is usually placed below the platform, due to being able to shoot into the map room from this position. The Scout or the Soldier usually watch the flank to make sure no attackers slip by. As on the second point, if the Medic is close to über, and the other team used theirs, you can retreat up the stairs, charge the remaining percentage, and go back down.
Resources[edit]
Video Guides[edit]
Text Guides[edit]
Casted Matches[edit]
- Atomsk and Kip analyze a Platinum scrim
- The Syndicate vs SNSD (EU vs NA) HL Showmatch
- Finland vs England Nations Cup Match
- USA vs Sweden Nations Cup Match
- Finland vs France Nations Cup Match
POVs[edit]
- UGC Platinum Engineer (Dave+) POV
- UGC Platinum Pyro (HueyLewis) POV with commentary
- Spy (watsyurdeal) POV with commentary
- UGC Platinum Heavy (Polk) POV with commentary
STV and POV demos[edit]
- STV demo of The Syndicate vs SNSD (EU vs NA) HL Showmatch
- Platinum Medic POV demo
- STV demo of -ts- vs mTs in UGC Platinum playoffs