Difference between revisions of "Swiftwater"
| Line 62: | Line 62: | ||
A sentry gun is typically overlooking the cart. Power classes from both sides tend to contest the upper lobby overlooking this gun position. Whilst there are flanks available to try and get behind the attacking teams players the defensive team has to balance this potential threat they can cause with the need for players stop to the cart. This balance may depend on the amount of pressure on it (number of attacking players pushing cart, how close it is etc.). | A sentry gun is typically overlooking the cart. Power classes from both sides tend to contest the upper lobby overlooking this gun position. Whilst there are flanks available to try and get behind the attacking teams players the defensive team has to balance this potential threat they can cause with the need for players stop to the cart. This balance may depend on the amount of pressure on it (number of attacking players pushing cart, how close it is etc.). | ||
| − | {{Maps navbox | + | {{Maps navbox}} |
[[Category:Maps]] | [[Category:Maps]] | ||
[[Category:Payload maps]] | [[Category:Payload maps]] | ||
Revision as of 11:27, 10 September 2013
Description
pl_swiftwater is a custom payload map made by What Is Schwa that is commonly used in Highlander.
History
Swiftwater is exclusively a Highlander map. The 'pl_swiftwater_ugc' variation has been in the UGC league Map List since Season 8 and Wireplay since Season 9.
Strategy
Attacking times on swiftwater tend to be longer than on other traditional payload maps such as Badwater and Upward. It is a more open map than either of those, with the layout offering a lot of height advantage as well to use for flanking and utility classes.
Defensive strategy can vary quite a lot depending on the team involved, it really is a map where a degree of familiarity and team synchronisation is required to play well. At higher levels a top sniper can be a nightmare to play against!
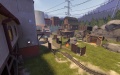
1st Point
Overview

The flank doorway


There is no definitive strategy for the first point hold although the consensus is this can be difficult to hold. If a team does try to hold they will typically be on the ledge in-front of the house. This can be vulnerable to spam and you run the risk of getting cut off if you lose your flank by the tunnel exit. Consequently many teams do not commit important classes to the defence of first at all, setting up in the tunnel. There can be interesting strategies to try and catch the attacking medic unawares and generally stall the push before 2nd.
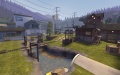
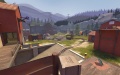
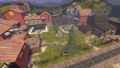
2nd Point and 3rd Point
Tunnel leading to 2nd and 3rd capture points
3rd from Attack's POV
3rd from Defence's POV


The bomb goes through the tunnel (2nd point is at the end of the tunnel) and a good defence here can be tough to break through without an uber, key picks by the spy or effective use of the top flank. I refer to the top flank, this is a one-way door (beware!) on the top right of the first point which grants access to a top corridor which leads onto a balcony overlooking the third point and red spawn. Control of this area can be important for both teams for the 3rd (and 2nd) points due to the substantial height advantage it offers. Defending, you should always be aware of who is up there at the very least. The 3rd point is traditionally one of the hardest points to attack in the map (along with the 4th and 5th). Teams can also place sentry guns and keep other players on the opposite side to the first point flank.
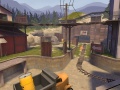
4th Point
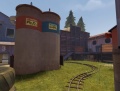
4th Point coming from 3rd, poor picture

Because the attack can go a number of different routes this can be an unusual point to defend. The sentry overlooks the cart in some position, and all other classes positioning can vary heavily you do see the combo near he sentry more often than not). Soldiers tend to roam on the far side to the spawn looking for drops on the medic or vulnerable people walking through the doors, and scouts get out onto the left (3rd point) if they can. Once the attacking team take this point the spawn doors behind the defence close and they essentially get trapped (blue spawn changes to directly infront of you too). Not getting caught here is often the key to a good 5th point defence.
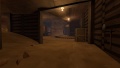
5th Point
5th Point from defence, Sniper spot!
5th Point in-game example


A long and potentially bloody attack up a hill for the 5th point, where the cart has to go a long way to go. The combo typically sets up on the ledge above the first section of uphill along with the engineer which allows them to shoot down onto the hill/and cart at first. Flank classes (defence, I am thinking solly and scout), if they can try, to get into the house on the far right (from the defences perspective). The two teams snipers are often the deciding factors here, on defence the sniper can be a long way back. For the attacking team the key is speed. If they can catch some players out on 4th and prevent this ideal defence being set-up that saves valueable time.
Last Point
A sentry gun is typically overlooking the cart. Power classes from both sides tend to contest the upper lobby overlooking this gun position. Whilst there are flanks available to try and get behind the attacking teams players the defensive team has to balance this potential threat they can cause with the need for players stop to the cart. This balance may depend on the amount of pressure on it (number of attacking players pushing cart, how close it is etc.).