Difference between revisions of "Logjam"
Jump to navigation
Jump to search
m (→Usage in competitive: Past tensed) |
m (Updated locations. Removed outdated images/article templates) |
||
| Line 1: | Line 1: | ||
| − | |||
{{Map infobox | {{Map infobox | ||
| mapname = LogJam | | mapname = LogJam | ||
| image = logjam.png | | image = logjam.png | ||
| − | | maptype = Control Point | + | | maptype = [[5CP|Control Point]] |
| currentversion = cp_logjam_b19 | | currentversion = cp_logjam_b19 | ||
| developer = Hyce | | developer = Hyce | ||
| Line 10: | Line 9: | ||
| extrainfo = | | extrainfo = | ||
}} | }} | ||
| − | '''cp_logjam''' is a 5cp custom map | + | '''cp_logjam''' is a 5cp custom map in decelopment, currently in the version cp_logjam_b19. |
== Usage in competitive == | == Usage in competitive == | ||
| Line 17: | Line 16: | ||
==Map Locations== | ==Map Locations== | ||
| − | |||
=== Middle Point === | === Middle Point === | ||
| Line 24: | Line 22: | ||
| title = Logjam — The middle point | | title = Logjam — The middle point | ||
| image = Logjam mid.jpeg | | image = Logjam mid.jpeg | ||
| − | | area1 = Under | + | | area1 = Under | x1 = 318px | y1 = 289px |
| − | | x1 = 318px | + | | area2 = Lower Log-Room | x2 = 186px | y2 = 255px |
| − | | y1 = 289px | + | | area3 = Top Log-Room | x3 = 224px | y3 = 192px |
| − | | area2 = Lower Log-Room | + | | area4 = Shack / Hut | x4 = 353px | y4 = 153px |
| − | | x2 = | + | | area5 = Choke | x5 = 423px | y5 = 141px |
| − | | y2 = | + | | area5 = Kitchen | x5 = 552px | y5 = 169px |
| − | | area3 = Top Log-Room | ||
| − | | x3 = | ||
| − | | y3 = | ||
| − | | area4 = Shack / Hut | ||
| − | | x4 = 353px | ||
| − | | y4 = 153px | ||
| − | | area5 = Choke | ||
| − | | x5 = 423px | ||
| − | | y5 = 141px | ||
| − | | area5 = Kitchen | ||
| − | | x5 = 552px | ||
| − | | y5 = 169px | ||
}} | }} | ||
| Line 48: | Line 34: | ||
| title = Logjam — The second point | | title = Logjam — The second point | ||
| image = Logjam second 1.jpeg | | image = Logjam second 1.jpeg | ||
| − | | area1 = Cave | + | | area1 = Cave | x1 = 200px | y1 = 390px |
| − | | x1 = | + | | area2 = Overhang / Doughnut | x2 = 554px | y2 = 423px |
| − | | y1 = | + | | area3 = Underpants | x3 = 400px | y3 = 216px |
| − | | area2 = Overhang / Doughnut | + | | area4 = Main | x4 = 724px | y4 = 277px |
| − | | x2 = | + | | area5 = Flank / Shutter | x5 = 552px | y5 = 106px |
| − | | y2 = | + | | area6 = Choke | x6 = 118px | y6 = 93px |
| − | | area3 = Underpants | + | | area7 = Log Room | x7 = 334px | y7 = 45px |
| − | | x3 = | + | | area8 = Log Room Side | x8 = 216px | y8 = 52px |
| − | | y3 = | ||
| − | | area4 = Main | ||
| − | | x4 = | ||
| − | | y4 = | ||
| − | | area5 = Flank / Shutter | ||
| − | | | ||
| − | | | ||
}} | }} | ||
| Line 69: | Line 48: | ||
| title = Logjam - Lobby | | title = Logjam - Lobby | ||
| image = Logjam_last_1.jpeg | | image = Logjam_last_1.jpeg | ||
| − | | area1 = Main | + | | area1 = Main | x1 = 434px | y1 = 129px |
| − | | x1 = 434px | + | | area2 = Sneaky | x2 = 100px | y2 = 208px |
| − | | y1 = 129px | + | | area3 = Shutter / I.T. | x3 = 665px | y3 = 128px |
| − | | area2 = Sneaky | + | | area4 = Wall | x4 = 528px | y4 = 195px |
| − | | x2 = 100px | ||
| − | | y2 = 208px | ||
| − | | area3 = Shutter / I.T. | ||
| − | | x3 = 665px | ||
| − | | y3 = 128px | ||
| − | | area4 = Wall | ||
| − | | x4 = 528px | ||
| − | | y4 = 195px | ||
}} | }} | ||
{{Map locations | {{Map locations | ||
| title = Logjam — The last point | | title = Logjam — The last point | ||
| image = Logjam_last_2.jpeg | | image = Logjam_last_2.jpeg | ||
| − | | area1 = Shutter | + | | area1 = Shutter | x1 = 35px | y1 = 220px |
| − | | x1 = 35px | + | | area2 = Top Right / Top Sneaky | x2 = 375px | y2 = 107px |
| − | | y1 = 220px | + | | area3 = (Lower) Right / Sneaky | x3 = 438px | y3 = 165px |
| − | | area2 = Top Right / Top Sneaky | + | | area4 = Main | x4 = 219px | y4 = 193px |
| − | | x2 = 375px | + | | area5 = Block | x5 = 302px | y5 = 195px |
| − | | y2 = 107px | ||
| − | | area3 = (Lower) Right / Sneaky | ||
| − | | x3 = 438px | ||
| − | | y3 = 165px | ||
| − | | area4 = Main | ||
| − | | x4 = 219px | ||
| − | | y4 = 193px | ||
| − | | area5 = Block | ||
| − | | x5 = 302px | ||
| − | | y5 = 195px | ||
}} | }} | ||
Revision as of 19:13, 9 May 2015
Template:Map infobox cp_logjam is a 5cp custom map in decelopment, currently in the version cp_logjam_b19.
Usage in competitive
Logjam is used mainly in 6v6. It was used in the ETF2L Season 19 & 20 and CEVO-P Season 6 map pools. The map was also featured in ozfortress' Second Summer Cup and ETF2L's Logjam Cup.
Map Locations
Middle Point
| Logjam — The middle point |
|---|
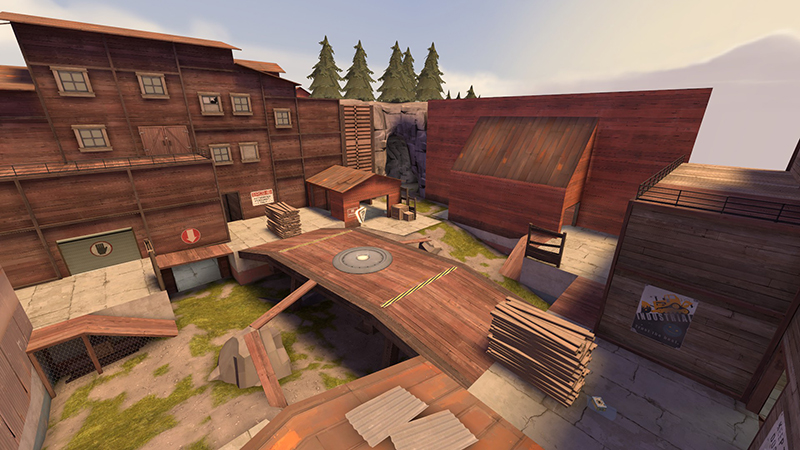
Under Lower Log-Room Top Log-Room Shack / Hut Kitchen |
Second Point
| Logjam — The second point |
|---|
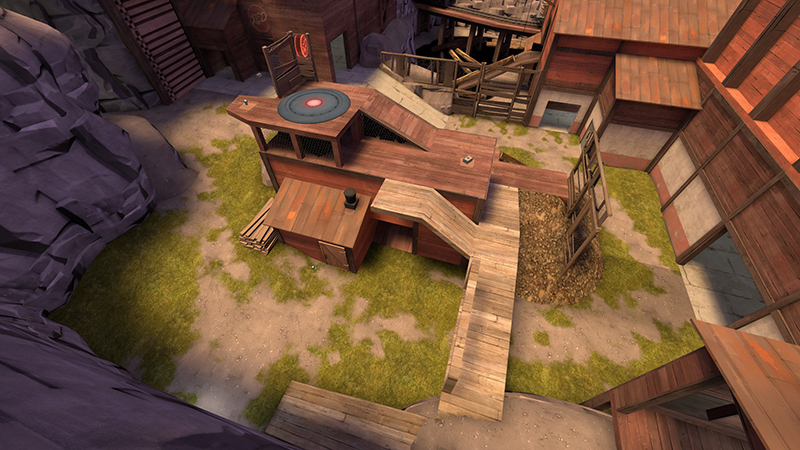
Cave Overhang / Doughnut Underpants Main Flank / Shutter Choke Log Room Log Room Side |
Last
| Logjam - Lobby |
|---|
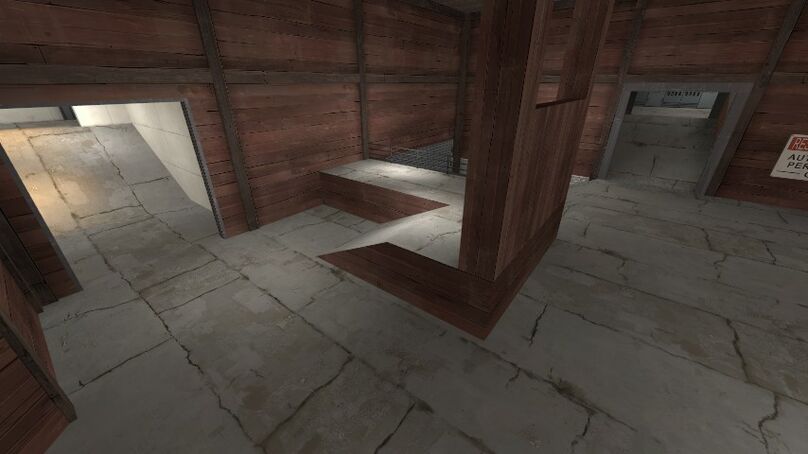
Main Sneaky Shutter / I.T. Wall |
| Logjam — The last point |
|---|
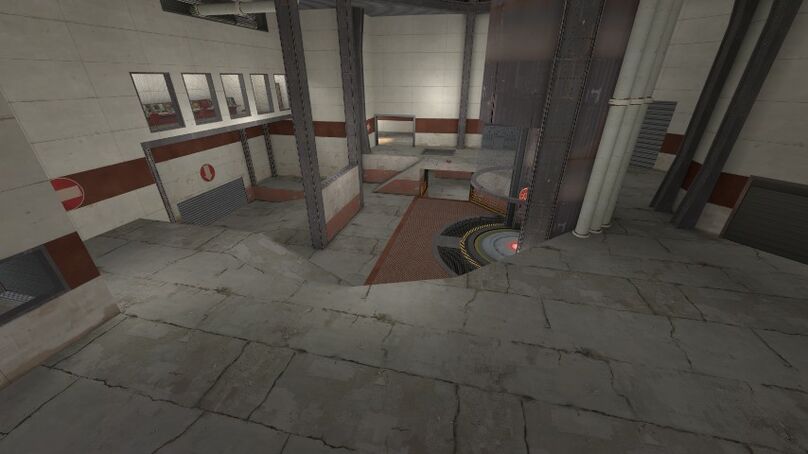
Shutter Top Right / Top Sneaky (Lower) Right / Sneaky Main Block |
Links