Difference between revisions of "Logjam"
Jump to navigation
Jump to search
| (6 intermediate revisions by the same user not shown) | |||
| Line 1: | Line 1: | ||
| − | {{ | + | {{Infobox map |
| − | | | + | | title = Logjam |
| − | |image= | + | | image = Logjam.jpg |
| − | |||
| − | | | + | | map_type = 5CP |
| − | | | + | | latest_version = cp_logjam_rc12f |
| − | | | + | | first_released = December 4, 2013 |
| − | | | + | | last_updated = May 10, 2020 |
| − | | | + | | developer1 = [https://steamcommunity.com/profiles/76561198007577013 Mark "Hyce" Huber] |
| − | | | + | | official_map = No |
| − | + | | download = https://dl.serveme.tf/maps/cp_logjam_rc12f.bsp | |
| − | |||
| − | |||
| − | |||
| − | |||
| − | |||
| − | | | + | | format = [[6v6]] |
| − | | | + | | in_rotation = None |
| − | + | }} | |
| − | |||
| − | |||
| − | |||
| − | |||
| − | |||
| − | + | '''Logjam''' is a 5cp custom map by Mark "Hyce" Huber. | |
| − | + | ||
| − | + | ==Map Locations== | |
| − | + | {{outdated}} | |
| − | + | === Middle Point === | |
| − | |||
| − | |||
| − | |||
| − | |||
| − | |||
| − | | | + | {{Map locations |
| + | | title = Logjam — The middle point | ||
| + | | image = Logjam mid.jpeg | ||
| + | | area1 = Under | x1 = 318px | y1 = 289px | ||
| + | | area2 = Lower Log-Room | x2 = 186px | y2 = 255px | ||
| + | | area3 = Top Log-Room | x3 = 224px | y3 = 192px | ||
| + | | area4 = Shack / Hut | x4 = 353px | y4 = 153px | ||
| + | | area5 = Choke | x5 = 423px | y5 = 141px | ||
| + | | area5 = Kitchen | x5 = 552px | y5 = 169px | ||
}} | }} | ||
| − | + | === Second Point === | |
| + | {{Map locations | ||
| + | | title = Logjam — The second point | ||
| + | | image = Logjam second 1.jpeg | ||
| + | | area1 = Cave | x1 = 200px | y1 = 390px | ||
| + | | area2 = Overhang / Doughnut | x2 = 554px | y2 = 423px | ||
| + | | area3 = Underpants | x3 = 400px | y3 = 216px | ||
| + | | area4 = Main | x4 = 724px | y4 = 277px | ||
| + | | area5 = Flank / Shutter | x5 = 552px | y5 = 106px | ||
| + | | area6 = Choke | x6 = 118px | y6 = 93px | ||
| + | | area7 = Log Room | x7 = 334px | y7 = 45px | ||
| + | | area8 = Log Room Side | x8 = 216px | y8 = 52px | ||
| + | }} | ||
| − | == | + | ===Last=== |
| + | {{Map locations | ||
| + | | title = Logjam - Lobby | ||
| + | | image = Logjam_last_1.jpeg | ||
| + | | area1 = Main | x1 = 434px | y1 = 129px | ||
| + | | area2 = Sneaky | x2 = 100px | y2 = 208px | ||
| + | | area3 = Shutter / I.T. | x3 = 665px | y3 = 128px | ||
| + | | area4 = Wall | x4 = 528px | y4 = 195px | ||
| + | }} | ||
| + | {{Map locations | ||
| + | | title = Logjam — The last point | ||
| + | | image = Logjam_last_2.jpeg | ||
| + | | area1 = Shutter | x1 = 35px | y1 = 220px | ||
| + | | area2 = Top Right / Top Sneaky | x2 = 375px | y2 = 107px | ||
| + | | area3 = (Lower) Right / Sneaky | x3 = 438px | y3 = 165px | ||
| + | | area4 = Main | x4 = 219px | y4 = 193px | ||
| + | | area5 = Block | x5 = 302px | y5 = 195px | ||
| + | }} | ||
| + | |||
| + | == Map pool history == | ||
{| class="wikitable emptycells-gray mw-collapsible" style="text-align:center" | {| class="wikitable emptycells-gray mw-collapsible" style="text-align:center" | ||
| − | |+ | + | |+ style="white-space:nowrap" | Logjam [[map pool history]] |
|- | |- | ||
! {{abbr|DL|Download link}} | ! {{abbr|DL|Download link}} | ||
! Map version | ! Map version | ||
| − | ! style="width: | + | ! style="width:120px" | Asia |
| − | ! style="width: | + | ! style="width:120px" | Europe |
| − | ! style="width: | + | ! style="width:120px" | North America |
| − | ! style="width: | + | ! style="width:120px" | Oceania |
|- | |- | ||
| − | ! | + | ! [[File:Download icon.png|20px|link=https://dl.serveme.tf/maps/cp_logjam_rc12f.bsp]] |
! style="text_align:left; font-weight:normal" | <code>cp_logjam_rc12f</code> | ! style="text_align:left; font-weight:normal" | <code>cp_logjam_rc12f</code> | ||
| | | | ||
| Line 60: | Line 83: | ||
| {{LeagueIconSmall|ozf}} [[OZF 28]] | | {{LeagueIconSmall|ozf}} [[OZF 28]] | ||
|- | |- | ||
| − | ! rowspan=3 | | + | ! rowspan=3 | [[File:Download icon.png|20px|link=https://dl.serveme.tf/maps/cp_logjam_rc11.bsp]] |
! style="text_align:left; font-weight:normal" rowspan=3 | <code>cp_logjam_rc11</code> | ! style="text_align:left; font-weight:normal" rowspan=3 | <code>cp_logjam_rc11</code> | ||
| | | | ||
| Line 77: | Line 100: | ||
| {{LeagueIconSmall|ozf}} [[OZF 25]] | | {{LeagueIconSmall|ozf}} [[OZF 25]] | ||
|- | |- | ||
| − | ! | + | ! [[File:Download icon.png|20px|link=https://dl.serveme.tf/maps/cp_logjam_rc10a.bsp]] |
! style="text_align:left; font-weight:normal" | <code>cp_logjam_rc10a</code> | ! style="text_align:left; font-weight:normal" | <code>cp_logjam_rc10a</code> | ||
| | | | ||
| Line 84: | Line 107: | ||
| {{LeagueIconSmall|ozf}} [[OZF 24]] | | {{LeagueIconSmall|ozf}} [[OZF 24]] | ||
|- | |- | ||
| − | ! | + | ! [[File:Download icon.png|20px|link=https://rotabland.eu/maps/map.php?id=8544&type=0]] |
! style="text_align:left; font-weight:normal" | <code>cp_logjam_rc5</code> | ! style="text_align:left; font-weight:normal" | <code>cp_logjam_rc5</code> | ||
| | | | ||
| Line 91: | Line 114: | ||
| {{LeagueIconSmall|ozf}} [[OZF 23]] | | {{LeagueIconSmall|ozf}} [[OZF 23]] | ||
|- | |- | ||
| − | ! | + | ! [[File:Download icon.png|20px|link=https://rotabland.eu/maps/map.php?id=5454&type=0]] |
! style="text_align:left; font-weight:normal" | <code>cp_logjam_b20</code> | ! style="text_align:left; font-weight:normal" | <code>cp_logjam_b20</code> | ||
| {{LeagueIconSmall|af}} [[AsiaFortress Cup 9|Cup 9]] | | {{LeagueIconSmall|af}} [[AsiaFortress Cup 9|Cup 9]] | ||
| Line 98: | Line 121: | ||
| | | | ||
|- | |- | ||
| − | ! | + | ! [[File:Download icon.png|20px|link=https://rotabland.eu/maps/map.php?id=5451&type=0]] |
! style="text_align:left; font-weight:normal" | <code>cp_logjam_b19</code> | ! style="text_align:left; font-weight:normal" | <code>cp_logjam_b19</code> | ||
| | | | ||
| Line 105: | Line 128: | ||
| | | | ||
|- | |- | ||
| − | ! | + | ! [[File:Download icon.png|20px|link=https://rotabland.eu/maps/map.php?id=5436&type=0]] |
| − | ! style="text_align:left; font-weight:normal" | <code> | + | ! style="text_align:left; font-weight:normal" | <code>cp_logjam_b10</code> |
| | | | ||
| {{LeagueIconSmall|etf2l}} [[ETF2L 6v6 Season 19|Season 19]] | | {{LeagueIconSmall|etf2l}} [[ETF2L 6v6 Season 19|Season 19]] | ||
| Line 112: | Line 135: | ||
| | | | ||
|} | |} | ||
| − | |||
| − | |||
| − | |||
| − | |||
| − | |||
| − | |||
| − | |||
| − | |||
| − | |||
| − | |||
| − | |||
| − | |||
| − | |||
| − | |||
| − | |||
| − | |||
| − | |||
| − | |||
| − | |||
| − | |||
| − | |||
| − | |||
| − | |||
| − | |||
| − | |||
| − | |||
| − | |||
| − | |||
| − | |||
| − | |||
| − | |||
| − | |||
| − | |||
| − | |||
| − | |||
| − | |||
| − | |||
| − | |||
| − | |||
| − | |||
| − | |||
| − | |||
| − | |||
| − | |||
| − | |||
| − | |||
| − | |||
| − | |||
==Links== | ==Links== | ||
Latest revision as of 06:05, 2 October 2022
| Logjam | |
|---|---|
 | |
| Map Information | |
| Map type | 5CP |
| Latest version | cp_logjam_rc12f
|
| First released | December 4, 2013 |
| Last updated | May 10, 2020 |
| Developer | Mark "Hyce" Huber |
| Official map | No |
| Download | |
| Competitive Information | |
| Format | 6v6 |
| In rotation | None |
Logjam is a 5cp custom map by Mark "Hyce" Huber.
Map Locations[edit]
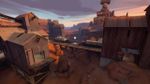
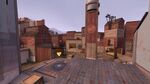
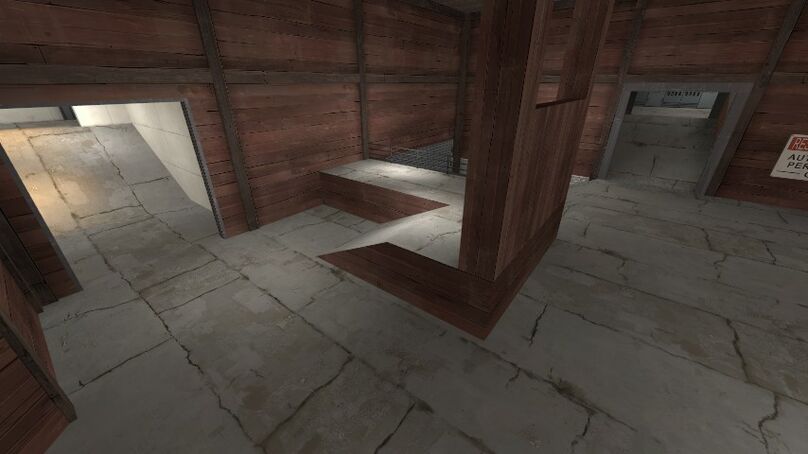
Middle Point[edit]
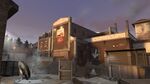
| Logjam — The middle point |
|---|
Under Lower Log-Room Top Log-Room Shack / Hut Kitchen |
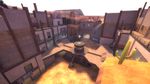
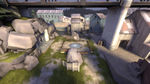
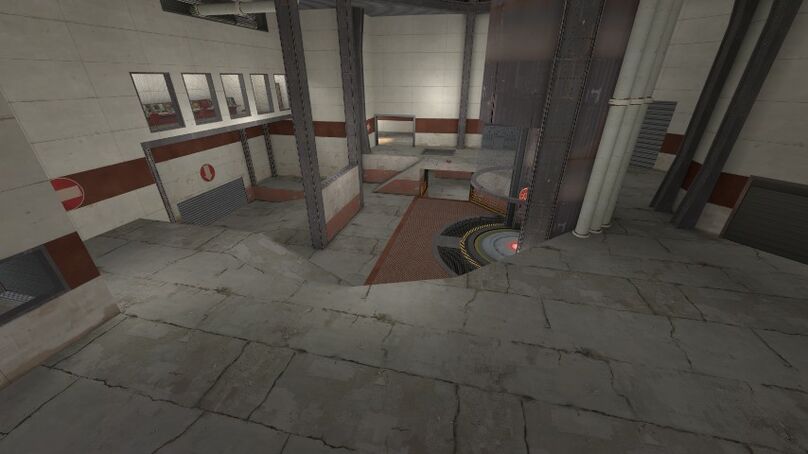
Second Point[edit]
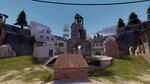
| Logjam — The second point |
|---|
Cave Overhang / Doughnut Underpants Main Flank / Shutter Choke Log Room Log Room Side |
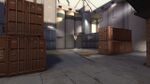
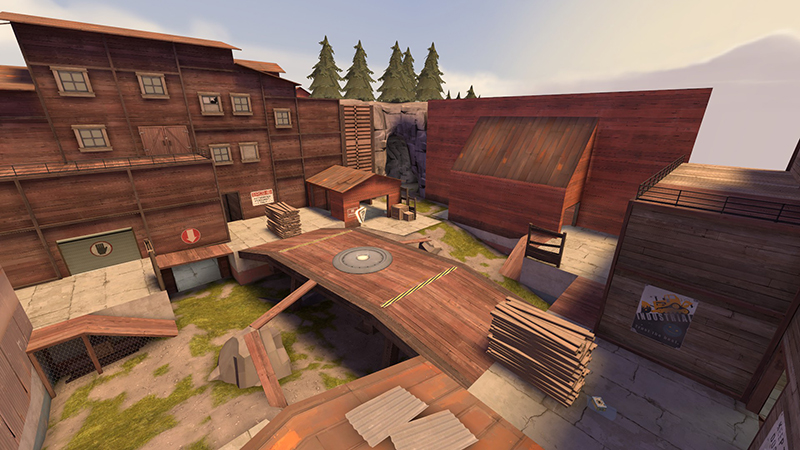
Last[edit]
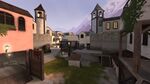
| Logjam - Lobby |
|---|
Main Sneaky Shutter / I.T. Wall |
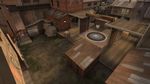
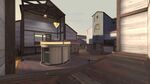
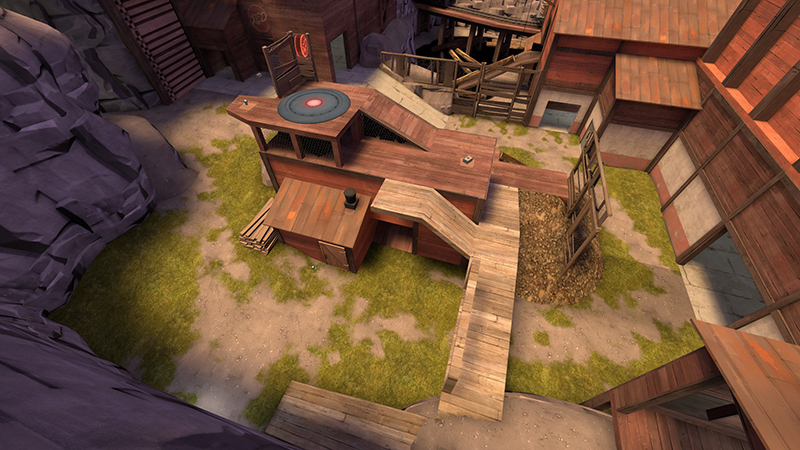
| Logjam — The last point |
|---|
Shutter Top Right / Top Sneaky (Lower) Right / Sneaky Main Block |
Map pool history[edit]
| DL | Map version | Asia | Europe | North America | Oceania |
|---|---|---|---|---|---|
cp_logjam_rc12f
|
|||||
cp_logjam_rc11
|
|||||
cp_logjam_rc10a
|
|||||
cp_logjam_rc5
|
|||||
cp_logjam_b20
|
|||||
cp_logjam_b19
|
|||||
cp_logjam_b10
|
Links[edit]
| 6v6 maps | |
| Currently in rotation | |
| 5CP | |
| KOTH | |
| Previously in rotation | |
| 5CP | Bazillion · Fastlane · Follower · Freight · Kalinka · Logjam · Mainline · Propaganda · Obscure · Reckoner · Sinshine · Warmfront · Waste (CP) · Well (CP) · Wildmire · Yukon |
| Attack/Defend | Dustbowl · Extraction · Gorge · Gravel Pit |
| Capture the Flag | 2Fort · Turbine · Well (CTF) |
| Domination | Standin |
| KOTH | Ashville · Coalplant |
| Payload | Gold Rush |