Difference between revisions of "Demoman"
m (Added see also) |
|||
| Line 1: | Line 1: | ||
| + | [[File:DemoIcon small.png|200px|right]] | ||
The Demoman is the fourth class of Team Fortress 2, and is labelled as a "Defensive" class by Valve. However, due to the variety of projectile weapons available to him, a Demoman can be highly versatile, able to both lead offensive pushes or to defend a given area. His role comprises area denial, choke spamming and control, and crowd control. The blast radius of his weapons makes him a ready counter to the Engineer's buildings, while he himself is opposed by most close-combat classes. A good Demoman can hold off an entire team with well-timed and well-placed spam. On 5CP and KOTH maps, he is most often the first to arrive at the midfight due to the use of Stickybomb Jumps, which allow for a high mobility over long distances, effectively countering his third-lowest move speed of all the classes. He possesses both the highest DPS in the game (using the Stickybomb Launcher) and the third-highest hitpoints. | The Demoman is the fourth class of Team Fortress 2, and is labelled as a "Defensive" class by Valve. However, due to the variety of projectile weapons available to him, a Demoman can be highly versatile, able to both lead offensive pushes or to defend a given area. His role comprises area denial, choke spamming and control, and crowd control. The blast radius of his weapons makes him a ready counter to the Engineer's buildings, while he himself is opposed by most close-combat classes. A good Demoman can hold off an entire team with well-timed and well-placed spam. On 5CP and KOTH maps, he is most often the first to arrive at the midfight due to the use of Stickybomb Jumps, which allow for a high mobility over long distances, effectively countering his third-lowest move speed of all the classes. He possesses both the highest DPS in the game (using the Stickybomb Launcher) and the third-highest hitpoints. | ||
Revision as of 00:45, 6 August 2013

The Demoman is the fourth class of Team Fortress 2, and is labelled as a "Defensive" class by Valve. However, due to the variety of projectile weapons available to him, a Demoman can be highly versatile, able to both lead offensive pushes or to defend a given area. His role comprises area denial, choke spamming and control, and crowd control. The blast radius of his weapons makes him a ready counter to the Engineer's buildings, while he himself is opposed by most close-combat classes. A good Demoman can hold off an entire team with well-timed and well-placed spam. On 5CP and KOTH maps, he is most often the first to arrive at the midfight due to the use of Stickybomb Jumps, which allow for a high mobility over long distances, effectively countering his third-lowest move speed of all the classes. He possesses both the highest DPS in the game (using the Stickybomb Launcher) and the third-highest hitpoints.
Contents
6v6
- Main article: Demoman (6v6)
In 6's, Demoman holds the primary role of dealing initial damage and crowd control. He makes sure the enemy never pushes into his team without taking damage and uses his spamming abilities to funnel the enemy team so they can be cleaned up by his teammates. He is also essential for defending as his sticky traps can get him easy kills and force the enemy to retreat, and his pill spam can easy chunk the enemy teams health if they are careless with their positioning. Demo is considered one of the harder roles in 6's due to his lack of mobility, causing him to have to consider his positioning carefully if he wishes to both not die quickly in a fight and still do substantial damage to the enemy. Due to the nature and main goal of the class being damage dealing, with great damage output potential at medium to long ranges, the demoman is often unprepared for close-range fights leaving him vulnerable to fast and dynamic classes such as the scout or a roamer soldier.
Highlander
- Main article: Demoman (Highlander)
In Highlander, the Demoman's main job is dealing high amounts of damage. His weapons are great at dishing out large amounts of damage to crowds of players and slow, high HP targets. However he lacks the ability to reliably protect himself from close range threats (most often from the Scout), so he is often paired up with the Heavy and Medic to form the core of a Highlander team. He serves a similar role to his 6's counterpart of dealing damage and leading up uber pushes, but he is also expected to deal with sentry nests.
Primary
| Weapon | 4v4 | 6v6 | Highlander | |||
|---|---|---|---|---|---|---|
 Launcher Grenade Launcher |
align="center" height="5px" | align="center" height="5px" | align="center" height="5px" | align="center" height="5px" | align="center" height="5px" | align="center" height="5px" |
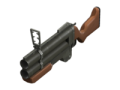
| The Grenade Launcher is recommended for medium to close range. A single grenade (or "pill") can do 102 damage when it is a direct hit. It can vary between 102 and 99 depending on how close of a direct hit the pill is. It is often used to spam chokes when the demo already has a sticky trap set up, and because pills are tangible they can roll across the ground if they have not hit someone directly before touching the wall or floor or ceiling (these are often called rollers). Rollers can do 35 to 70 damage depending on the distance from the person they are near. | ||||||
 Baba's Wee Booties Ali Baba's Wee Booties |
align="center" height="5px" | align="center" height="5px" | align="center" height="5px" | align="center" height="5px" | align="center" height="5px" | align="center" height="5px" |
| The Ali Baba's Wee Booties increase the demoman's health from 175 to 200, allowing him to take more spam and survive for longer. Many demomen wear the item because their grenade aim is off or bad, or for kritzkrieg pushes in order to stay alive longer without invulnerability. | ||||||
 Loch-n-Load |
align="center" height="5px" | align="center" height="5px" | align="center" height="5px" | align="center" height="5px" | align="center" height="5px" | align="center" height="5px" |
| Most demomen do not use the Loch because of its required high-accuracy aim and also because of the heightened splash damage taken from a close range pill, but also because other players not hit by it do not take splash damage. | ||||||
 Cannon Loose Cannon |
align="center" height="5px" | align="center" height="5px" | align="center" height="5px" | align="center" height="5px" | align="center" height="5px" | align="center" height="5px" |
| The Loose Cannon is rarely used in competitive, it lacks the damage potential of a grenade launcher both up close and at long range. The cannonballs do 16-48 splash damage after they hit the ground, compared to 22-64 of the grenade launcher. | ||||||
Secondary
| Weapon | 4v4 | 6v6 | Highlander | |||
|---|---|---|---|---|---|---|
 Launcher Stickybomb Launcher |
align="center" height="5px" | align="center" height="5px" | align="center" height="5px" | align="center" height="5px" | align="center" height="5px" | align="center" height="5px" |
| The Stickybomb Launcher is the most versatile weapon for the demoman, and almost all upper-level competitive demomen swear by it. It can be used for almost any range, from close to medium to far, because of its charging ability. A single stickybomb (mostly referred to as a "sticky") will do 135 damage maximum and 20 damage minimum depending on the distance of the enemy player. By holding down the left click button, the demoman can charge a sticky in order to fire it farther, proportional to the amount of time charged. Many use this for area denial by spamming long-range stickies through a choke point that is too long for pills to reach. It is also used to plant a "stickytrap", a small, packed together group of stickies on a wall outside of a choke point that is detonated when a team pushes through, dealing high amounts of damage. Some well-placed stickytraps can often go unseen and may even kill multiple enemies. It is also used for sticky-jumps, where the player places a sticky under their feet and detonates it to propel them in a certain direction at high-speeds. The minimum damage from a successful stickyjump a player can take is 45, and can do around 100 damage max (often resulting in a failed stickyjump). | ||||||
 Jumper Sticky Jumper |
align="center" height="5px" | align="center" height="5px" | align="center" height="5px" | align="center" height="5px" | align="center" height="5px" | align="center" height="5px" |
| The Sticky Jumper can be used in combination with the Ullapool Caber to attempt a pick on the medic or other important class. It is occasionally used as a way of flanking the other team. Usage of this weapon is typically in desperation to rush to the point, or simply "trolling" the other team. | ||||||
 Targe Chargin' Targe |
align="center" height="5px" | align="center" height="5px" | align="center" height="5px" | align="center" height="5px" | align="center" height="5px" | align="center" height="5px" |
| A very small portion of high-level players still use this, as it denies them the ability to arrive at midfights first and a fraction of the damage that they could do before, and with many new updates disabling some charge scripts, many find it harder to use without a clear path. | ||||||
 Screen Splendid Screen |
align="center" height="5px" | align="center" height="5px" | align="center" height="5px" | align="center" height="5px" | align="center" height="5px" | align="center" height="5px" |
| Splendid Screen Info. | ||||||
 Resistance Scottish Resistance |
align="center" height="5px" | align="center" height="5px" | align="center" height="5px" | align="center" height="5px" | align="center" height="5px" | align="center" height="5px" |
| Scottish Resistance Info. | ||||||
Melee
| Weapon | 4v4 | 6v6 | Highlander | |||
|---|---|---|---|---|---|---|
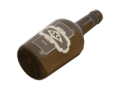 Bottle |
align="center" height="5px" | align="center" height="5px" | align="center" height="5px" | align="center" height="5px" | align="center" height="5px" | align="center" height="5px" |
| The Bottle is the default melee weapon for the Demoman. | ||||||
 Train Pain Train |
align="center" height="5px" | align="center" height="5px" | align="center" height="5px" | align="center" height="5px" | align="center" height="5px" | align="center" height="5px" |
| The Pain Train lets you cap at 2x speed, but gives you a 10% vulnerability to bullets. Many Demomen use the Pain Train in Stopwatch games on Offense to maximize cap time and therefore also their team's chances of having the faster time. | ||||||
 Caber Ullapool Caber |
align="center" height="5px" | align="center" height="5px" | align="center" height="5px" | align="center" height="5px" | align="center" height="5px" | align="center" height="5px" |
| The Ullapool Caber is usually used to get a medic pick at the start of a round. This strategy is most often used on Badwater and Lakeside. | ||||||
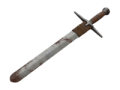 Eyelander |
align="center" height="5px" | align="center" height="5px" | align="center" height="5px" | align="center" height="5px" | align="center" height="5px" | align="center" height="5px" |
| Eyelander Info. | ||||||
 Skullcutter Scotsman's Skullcutter |
align="center" height="5px" | align="center" height="5px" | align="center" height="5px" | align="center" height="5px" | align="center" height="5px" | align="center" height="5px" |
| Scotsman's Skullcutter info. | ||||||
| link=http://wiki.teamfortress.com/wiki/Claidheamh Mòr Mòr Claidheamh Mòr |
align="center" height="5px" | align="center" height="5px" | align="center" height="5px" | align="center" height="5px" | align="center" height="5px" | align="center" height="5px" |
| Claidheamh Mor Info. | ||||||
 Persuader Persian Persuader |
align="center" height="5px" | align="center" height="5px" | align="center" height="5px" | align="center" height="5px" | align="center" height="5px" | align="center" height="5px" |
| While the ammo to health conversion may help in some situations, it becomes impossible to use stickies to spam chokes as you quickly run out. | ||||||